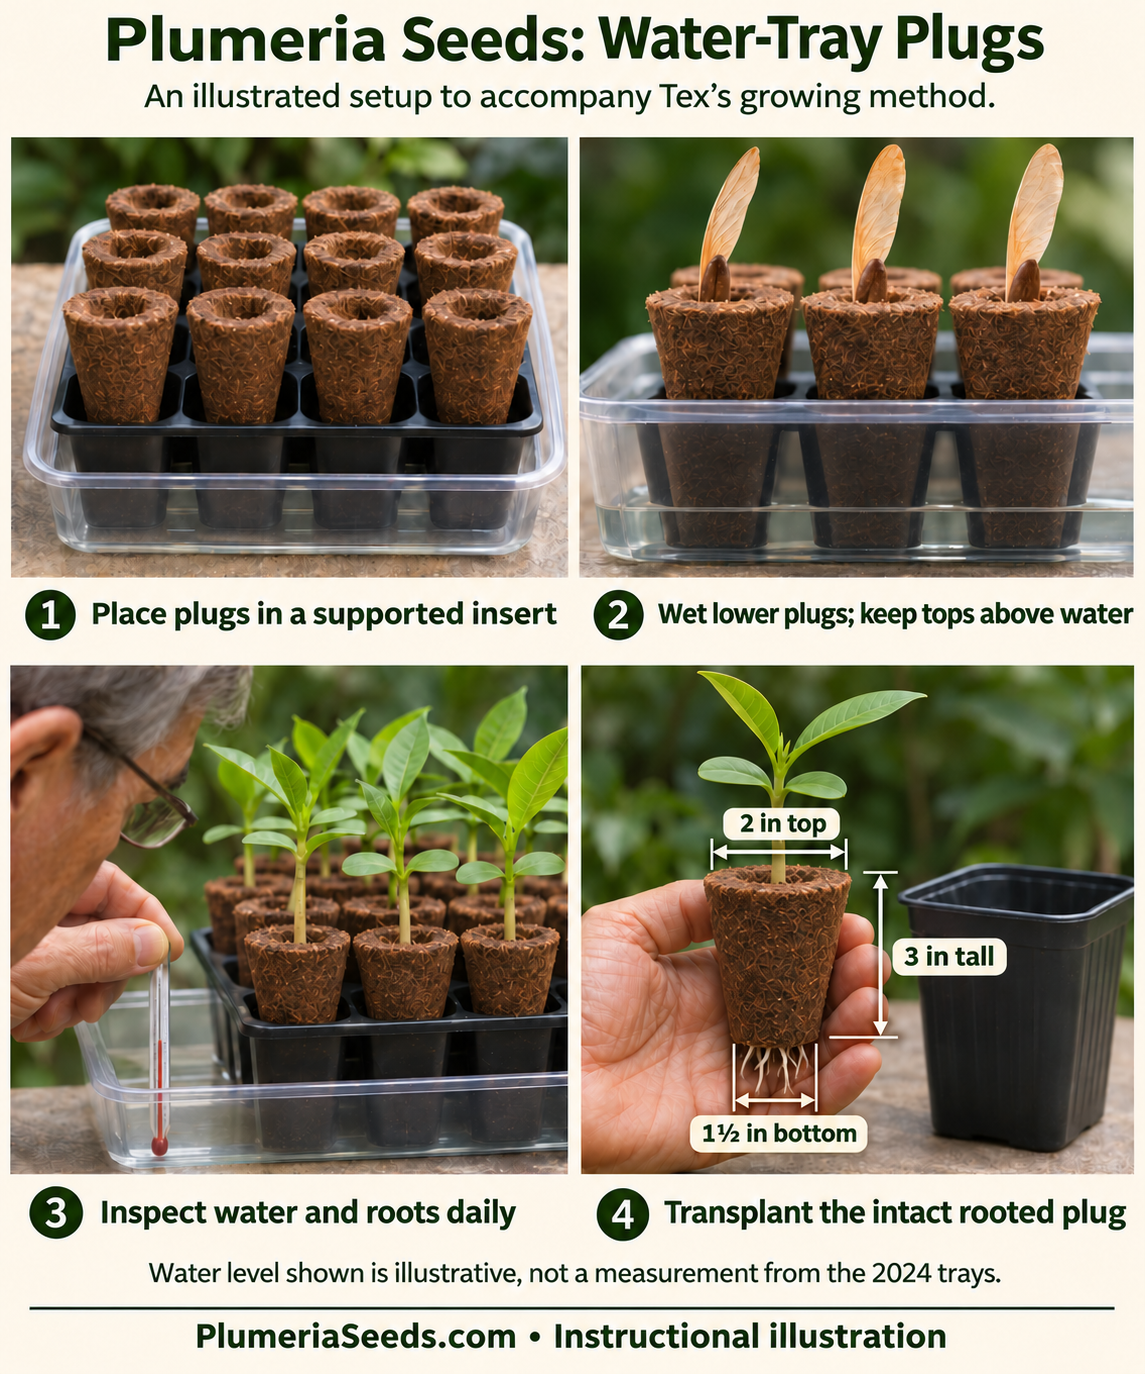
My setup uses tapered growing plugs that are 3 inches tall, 2 inches across the top, and 1½ inches across the bottom, held in a matching plug tray, sitting inside a solid flat tray that holds water. In March 2024, I planted seed from Majestic and grew the seedlings outdoors in full sun from the beginning. One flowered at about seven months. Majestic was the seed parent; the pollen parent was unknown. That result belongs to one seedling and one growing season.
Best fit: Growers able to inspect a shared water reservoir closely.
What you need
- Tapered growing plugs: 3 inches tall, 2 inches across the top, and 1½ inches across the bottom; matching support tray and solid water-holding flat tray.
- Labels, well water as used in my batch, ordinary 3% hydrogen peroxide, measuring utensils, Excalibur BOOST and BioBlast 7-7-7.
- One-gallon pots and suitable drained potting mix for transplanting. For someone repeating the setup: a water/medium thermometer and a way to measure the reservoir volume.
Step by step: what to do and why
1. Keep the batch record together
Label the cross Majestic × unknown, with the March 2024 sowing date and separate seedling identifiers. For a new batch, record its own parentage and exact date.
Why: The seedling that flowers is not a clone of its seed parent. Its future photographs and dates should stay connected to that individual.
2. Use the soak I actually used
I soaked the seeds overnight in 2 US fluid ounces of ordinary 3% hydrogen peroxide added to one US gallon of well water. I then planted them into the plugs.
Why: Water starts hydration. This observation does not establish that peroxide was necessary or responsible for the early bloom. It is a seed-soak record, not an instruction to keep adding peroxide to the growing reservoir.
3. Support the plugs above the reservoir floor
Place the plugs in their matching insert and set it into the solid tray. Hydrate the plugs and put each seed body into its planting opening with the wing exposed.
Why: The insert supports the plugs and makes it possible to move a whole rooted plug later. The original batch did not include a recorded water-depth measurement.
4. Test the water level before scaling up
For a repeat trial, start with water contacting the lower plug portion, keep the seed opening and emerging stem above standing water, and check that moisture reaches seed depth. Mark the level and record the actual water volume.
Why: This is added operating guidance, not a measured detail from my 2024 trays. Plug materials vary, and a full tray does not automatically leave enough air around every root.
5. Record the BOOST addition accurately
I used Excalibur BOOST at 1 tablespoon per gallon of tray water and left the granules in the tray. Keep that recorded dose separate from the physical water-level decision.
Why: Some fertilizer may release gradually. Granules remaining in water do not mean the product instantly or completely dissolved, and this was not a measured hydroponic nutrient solution.
6. Monitor the growing conditions
I used outdoor full sun from the beginning. For someone repeating the method elsewhere, measure the plug and water temperature during the hottest part of the day and check again after weather changes.
Why: My exposure history is not an instruction to move indoor-grown seedlings suddenly into full sun. Regional weather records in the original article provide context; they are not measurements from my trays.
7. Inspect and refresh the reservoir
I changed the water as needed. For a repeat trial, inspect daily for cloudiness, odor, algae, roots and debris, and after heavy rain. Record when water is topped up or replaced.
Why: Shared water can spread a problem through the tray. My record does not specify a fixed interval or how residual granules were handled, so do not assume that every refill received another full dose.
8. Keep foliar feeding distinct
I sprayed BioBlast 7-7-7 at 1 tablespoon per gallon every two weeks until transplanting. My exact first-spray stage was not recorded.
Why: This is a separate application route from fertilizer in the tray. It does not show that foliar feeding alone caused faster growth. For a repeat, follow the current label, avoid heat-stressed foliage and account for existing nutrients.
9. Transplant the rooted plug
At six weeks I moved the seedlings into one-gallon pots and used 2 tablespoons of Excalibur BOOST per pot. Support the entire plug and settle the new mix around it without burying the stem deeply.
Why: Those are my timing and amounts. Another batch should also be judged by root development and growth, and the current product formulation and label need checking.
10. Follow the plant beyond germination
Record establishment, leaf growth, setbacks and flowering on the same individual record. Check moisture in the original plug as well as the surrounding potting mix after transfer.
Why: The practical value of the method is the healthy plant it produces. A fast first root and a fast first flower are different outcomes, and neither identifies which product made the difference.
When something is not going as expected
Plug stays saturated or roots deteriorate
Isolate affected plugs, refresh and clean the reservoir, and reconsider water depth and substrate suitability. Lowering water is useful only if the seed/root zone still receives enough moisture.
Water evaporates but granules remain
Do not automatically replace the original fertilizer dose. Dissolved salts and unreleased granules may remain; without measurements and label guidance the concentration is unknown.
A different seedling does not bloom at seven months
That does not by itself mean germination failed. Genetics, maturity, season and later care all contribute, and the seven-month result is not a guaranteed schedule.
What I would watch next
Why I think the setup helped: it kept water available and allowed transplanting with the root system inside an intact plug. Warmth, light and nutrition could support continued growth. Those are plausible explanations, not a controlled demonstration of each product’s effect. I would compare otherwise matched batches before claiming that any one part caused the result.
Method infographic
Sources and scope
The steps are an original home-growing synthesis. Source accounts establish documented use; the added monitoring and handling instructions are practical guidance, not results from a controlled comparison.
- Tex Norwood — How I Grow Plumeria Seedlings in Plugs and Water Filled Trays — March 2024 batch details confirmed directly by Tex in this conversation; Firsthand grower record.
- Tex Norwood — Germinating Seeds & Growing Seedlings with Hydroponics — Firsthand nursery observations of plugs in water trays. Different years and nutrient programs must not be merged.
- Yafuso et al. (2019) — Water and air relations in propagation substrates — Peer-reviewed substrate physics, DOI 10.21273/HORTSCI14145-19. Peat, rockwool and phenolic foam in propagation cells; not a test of FCN plugs or plumeria seeds.
- University of Minnesota Extension — Small-scale hydroponics — General root oxygen, nutrient and reservoir principles; no validated plumeria nutrient recipe.