This page explains how fertilizer, potting mix, water, and roots work together for plumeria seedlings. For the current feeding schedule, use Fertilizing New Plumeria Seedlings.
Seedlings Do Not Need Fertilizer Immediately
A germinating seed uses reserves stored inside the seed. Wait until the seedling is actively growing, has several sets of true leaves, and has working roots before beginning a regular fertilizer program. If the growing mix already contains starter or controlled-release fertilizer, wait longer and judge the seedling’s response rather than adding another product automatically.
Start With the Growing Mix
Plumeria seedlings are commonly grown in a soilless potting mix, not garden soil. Read the mix label before feeding: some mixes contain no fertilizer, while others include a starter charge or controlled-release fertilizer. A standard mineral-soil test is not the right test for a soilless container mix. When a persistent problem needs laboratory diagnosis, request a greenhouse or soilless-media test that measures pH, electrical conductivity (soluble salts), and nutrients.
What a Complete Fertilizer Provides
Plants make sugars through photosynthesis; fertilizer is not food. Fertilizer supplies mineral nutrients required for growth. The three numbers on a fertilizer label describe nitrogen, phosphate, and potash percentages. Seedlings also need micronutrients, so choose a complete product whose label lists micronutrients such as magnesium, iron, manganese, zinc, copper, boron, and molybdenum.
Use the product label’s seedling or transplant directions when available. Products differ in concentration and formulation, so the same scoop or teaspoon is not interchangeable between brands.
A Safe Starting Baseline
For actively growing seedlings in an unfertilized soilless mix, the site’s current baseline is a complete water-soluble fertilizer at about one-quarter label strength once a week, with plain water as needed during the rest of the week. Never fertilize dry or badly stressed roots. Increase strength only gradually when the seedlings remain healthy and actively growing.
This is a starting point, not a universal calendar. Container size, root development, temperature, light, irrigation frequency, the fertilizer already present in the mix, and the product label all affect how much fertilizer a seedling can use safely.
Why More Is Not Better
Fertilizers are salts. In a small container, excess fertilizer or minerals from irrigation water can accumulate around the roots. Warning signs can include a white crust on the mix or pot, browning at leaf tips or margins, stalled growth, or damaged roots. Those symptoms are not proof of one particular nutrient problem, so review the entire growing situation before adding another product.
- Use containers with open drainage holes.
- Do not let drainage water remain where the pot can reabsorb it.
- If seedlings are bottom-watered, occasionally water gently from above so dissolved salts can move out through the drainage holes.
- Do not stack liquid fertilizer, controlled-release fertilizer, and nutrient-rich mix without accounting for all three sources.
- If salt accumulation is suspected, correct the fertilizer source and leach only through a freely draining container; do not keep waterlogged roots wet in an attempt to “flush” them.
Diagnose Before Correcting
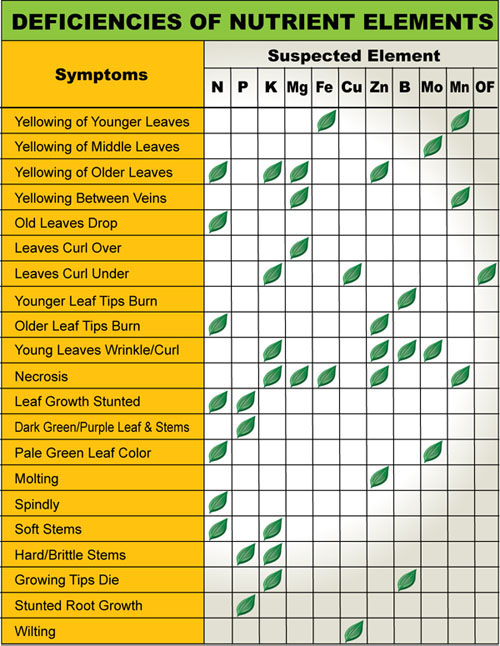
Yellowing, slow growth, weak stems, or leaf damage can come from root injury, excess water, dry mix, cold, insufficient light, fertilizer salts, pests, disease, or a nutrient problem. First check root condition, moisture, drainage, temperature, light, the mix label, and the recent fertilizer record. If the cause remains unclear, a greenhouse or soilless-media test is more useful than guessing from a single leaf symptom.
Avoid These Common Mistakes
- Feeding newly germinated seedlings “as soon as possible.”
- Using full-strength fertilizer before the root system is established.
- Applying fertilizer to dry, wilted, cold-stressed, diseased, or recently damaged roots.
- Copying garden-soil or manure application rates into small containers.
- Changing pH or adding individual nutrients without a suitable test or a clear diagnosis.
- Assuming dark green growth always means the fertilizer program is balanced.
Keep the Schedule Separate
This article is the background explanation. Use Fertilizing New Plumeria Seedlings for the practical readiness checklist and weekly starting schedule.