How Nutrients work with Plumeria Seedlings

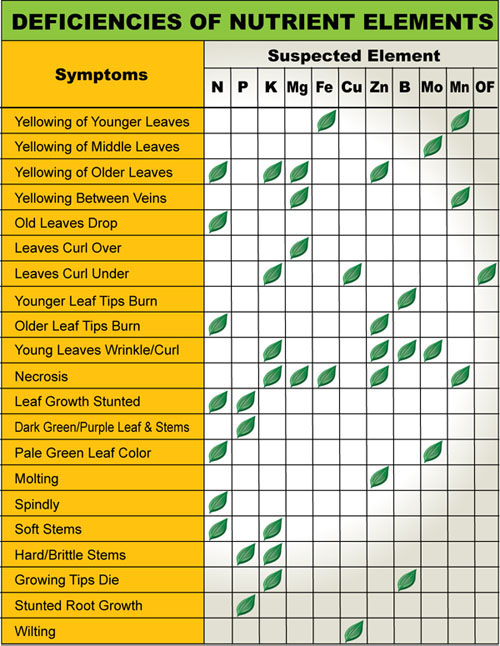
Plumeria seedlings need nutrients as soon as possible to grow well, along with water and adequate sunlight.

When plumeria seedlings have roots they are looking for nutrients, when they have real leaves they are capable of processing nutrients into plant food via photosynthesis.

Fertilizers supplement essential nutrients in the soil needed by plumeria for healthy, vigorous growth. Contrary to popular belief, fertilizers are not plant food. Plants manufacture their own food from water and carbon dioxide through photosynthesis. Fertilizers provide the nutrients plants need to convert into plant food and grow.

To grow healthy crops full of nutrients, growers need to ensure they have healthy soil. Plants use up nutrients as they grow and without fertilizers, nature struggles to replenish the nutrients in the soil. The soil and water pH is also a major factor in a plant’s ability to convert nutrients into plant food.

A soil test is the only accurate and definitive way to determine how much of any substance is present in your soil. You can send samples to your local county extension or to a testing lab, or you can use a test kit purchased from a nursery or garden center. If the test shows a high concentration of Nitrogen, Phosphorus or Potassium, it could mean that the fertilizer you are using contains too much of it.

What is plumeria fertilizers?

Fertilizers are frequently referred to as plant food, which is really not correct. Actually, it is the carbon dioxide in the air and the water in the soil, which in the presence of sunlight are converted into sugars and carbohydrates by a process called ‘Photosynthesis’, that do the actual feeding of the plant. Fertilizer is much more analogous to vitamins. The Nitrogen, Phosphorus and Potassium and other trace elements contained in the fertilizers are necessary for cell division and enzyme processes that allow photosynthesis and growth to proceed. A fertilizer, often referred to as plant food, is a broad term for either a mixture of chemicals or naturally occurring matter that is used for enhancing the growth of plants.

How do fertilizers work?

Fertilizers work by providing essential nutrients needed to developing flowers, roots, branches, and vegetation. Many fertilizers also improve the way the soil works by helping it to retain water better and allowing air to flow freely, very good for roots.

The main ingredients in most popular fertilizers are N, P and K the basic elements required in plant growth, Nitrogen (N), Phosphorus (P) and Potassium (K).

The Nitrogen element works by increasing the plant’s capacity to produce new stems, flowers or fruit. It also increases the speed at which it will grow and improves the quality and appearance of the foliage.

Phosphorus helps the plumeria produce all of that nice organic stuff like oils and starch which is great for forming large, strong root systems. Phosphorus also helps the plant to develop Chlorophyll, which allows it to turn solar energy into chemical energy (photosynthesis). Combined with Potassium, Phosphorus helps produce healthy flowers and seeds. 

Lastly, Potassium helps to build protein, fight off diseases and, just like Phosphorus, is essential in the process of photosynthesis.

All of the above are required to work together to produce a good healthy plumeria if just one of these valuable nutrients are missing or lacking your plant will struggle to produce fruits or flowers of the highest quality.

What else do plumeria love about fertilizers?

Nutrients normally occur naturally in well-maintained soils but if there’s a drainage issue or other problem, nutrients can soon disappear. Plumeria loves water but does not like to stand in water. The best soil for plumeria is soil mix that drains well and may require more watering than other soils and also causes the nutrients to wash out sooner. Adding fertilizer is a way of giving nature a helping hand.

Natural and man-made fertilizers can contain a variety of ingredients, but here are a few of the most important ones for plumeria in addition to the standard Nitrogen, Phosphorus and Potassium as described above.

  • Zinc
  • Magnesium
  • Copper
  • Calcium
  • Sulfur
  • Manganese
  • Molybdenum
  • Iron
  • Boron

You can also get fertilizers that are fit for the purpose of a specific plant or species. These are important as different plants, Plumeria, requires a careful balance of certain nutrients. If a general purpose fertilizer is used it may not provide all the nutrients plumeria require.

Too Much Nitrogen

  • Excess Foliage Growth – One of the main actions of nitrogen is increasing chlorophyll production; this process is done by creating bigger leaf structures with larger surface areas for the photosynthesizing pigment. Excess nitrogen fuels fast foliage growth so that your garden has an appearance of a jungle gone wild, but another plant growth suffers as a consequence. Energy for flower growth is redirected to foliage proliferation, so plants may not even produce their necessary reproductive organs during the growing season.
  • Burning and Salt Concentration – If you use a high-nitrogen fertilizer mixture, you also increase the soil’s mineral salts; excessive elemental nitrogen takes water away from the plant while leaving the salts behind. As a result, the leaves take on a burnt look from dehydration. Leaf edges become yellow or brown and wilt. Flushing the area with water to remove the excess nitrogen is the best course of action to revive the plant. Although the nitrogen produces desired large foliage, you may find that the rapid growth becomes decimated with leaf burn if nitrogen stays at high levels.
  • Root Growth Stunting – Energy used for large leaf growth stifles the root system below with high nitrogen soil levels. Roots slow their naturally spreading habit since they do not have the necessary nutrients to use as energy as the elements are redirected upward. As a result, the plant may be destabilized in its soil position; if it is tall enough, it may blow over in heavy winds. Additionally, stressed roots invite disease through soil pathogens as well. In the end, both leaves and roots succumb to nitrogen-induced stresses that damage the plant throughout its length.
  • Groundwater Pollution – Plants cannot absorb all the excess nitrogen in the soil. Those extra nitrogen levels slowly leach out of the soil through water runoff; the nitrogen is effectively in the form of nitrates due to microbial conversion when it leaches from the soil. As a result, groundwater and drinking water becomes contaminated from the nitrate levels. Between harming the plants and the surrounding water supplies, high nitrogen levels around plants need to be closely monitored and amended for natural harmony.

Too Much Phosphorus!

  • Iron Deficiencies in Plants – When there is too much phosphorus in the soil, the plant’s ability to take up necessary amounts of iron is compromised. Even where soil levels are tested and show appreciable amounts of iron, plants may have trouble utilizing it because the phosphorus disrupts their natural processes. Usually, the symptoms are most evident in young plant tissues and can be confused with the symptoms of zinc deficiency, making it hard to correct the problem.
  • Zinc Deficiencies in Plants – Exactly as in the case of iron deficiencies, an overabundance of phosphorus in the soil means it is hard for plants to get necessary levels of zinc from their growing medium, even when the zinc is there for the taking. A zinc deficiency manifests in a bleaching effect of the plant tissues, in rosetted terminal leaves and in yellowing of the leaves in between the veins. Because the symptoms are often the same as iron deficiency, the best way to correct the problem is to perform soil tests to figure out how much phosphorus already exists and to add only enough to keep plants healthy.
  • Phosphorus Buildup From Application of Nitrogen – Many gardeners and crop growers use animal manure to supply the soil with nitrogen, a necessary nutrient for plant growth. Most manures contain around the same amount of nitrogen and phosphorus, but plants use 2.4 to 4.5 times as much nitrogen as phosphorus, leaving much of the phosphorus untouched in the soil. This can also happen in the application of biosolids or commercial fertilizers. In the case of commercial fertilizers, however, you can buy a mix balanced fertilizer to meet your needs, which often means that the amounts of phosphorus are lower (for instance, 20-10-10, which is 20 parts nitrogen to 10 parts each phosphorus and potassium).
  • Water Pollution – Because phosphorus is water-soluble, it easily becomes waterborne. Whenever a buildup of the nutrient in the soil cannot be utilized by plants, it is free to run off during rains into the streams, rivers, and waterways in the surrounding areas as well as leach into the water table through the soil. This increases the fertility of watery areas, called eutrophication, causing algae blooms and the explosion of quickly growing fish populations at the expense of beneficial organisms. It also makes purifying water more difficult and can result in insect increases that feed on the algae.

Too Much Phosphate 

  • Preventive Measures – Establishing the right balance between potassium and other soil components is more about controlling how much goes into the soil than trying to reduce it once it’s there. If a soil test indicates a high level of potassium, literally start from the ground up by not adding more to it in the form of a multipurpose fertilizer. Typical fertilizer blends are generally composed of the three most important substances — nitrogen, phosphorus, and potassium — which are indicated on the packaging by the letters N, P, and K. Selecting a blend that is low in potassium, or K, or contains none at all, is a first step in assuring that it doesn’t build up to unsuitable levels in the soil.
  • Plant Distress Signals – Too much potassium disrupts the uptake of other important nutrients, such as calcium, nitrogen, and magnesium, creating deficiencies that usually produce visible effects. A calcium deficiency produces irregularly shaped new leaves and blossom end rot on plants, such as tomatoes (Lycopersicon esculentum ), that produce fruit. As frost-tender plants, tomatoes can be grown in U.S. Department of Agriculture plant hardiness zones 2 to 10 if set out into the garden once the soil has warmed to at least 60 degrees Fahrenheit. A nitrogen deficiency is suspected when older lower leaves on plants turn yellow while the rest remains a light green. Plants lacking magnesium will exhibit yellowing of the edges of older leaves that may also develop an arrowhead shape in their centers. While adding more of these substances to correct the imbalance may help, the excess potassium will most likely impact their long-term effectiveness.
  • A Healthy Balance – When present in the soil in proper amounts, potassium helps with photosynthesis, the process by which plants manufacture their own food using the sun’s energy; helps plants absorb other nutrients more efficiently; creates a favorable environment for micro bacterial action; and provides turgor, or the ability of plants to stay upright. Distribute excess potassium more evenly by thoroughly working dense soil until it is loose and friable. Dilute and flush out large amounts of potassium by watering the soil any time it appears dry to a depth of one inch. Schedule any fertilizing within several weeks before planting, so that the potassium doesn’t have time to accumulate during the off-season. To minimize long-term potassium buildup, consider using aged or composted animal manure as a substitute for commercial fertilizers, as its components break down more slowly to keep up with plant demand. If using manure, apply it at a rate of 40 pounds for every 100 feet, and work it into the soil to a depth of 6 to 9 inches.
How Nutrients work with Plumeria Seedlings

2019 Project – Planting and Growing Plumeria from Seeds

My favorite way to germinate and grow plumeria seeds.
After soaking I placed the Camelot seeds in FCN FlexiPlugs leaving their flags sticking out. After soaking for 4 hours, 68 out of 70 seeds passed the viability test. Usually, viable seed will soak up enough water to cause them to sink to the bottom of the container. The plumeria seed embryo is the part of a seed that contains the earliest forms of a plant’s roots, stem, and leaves. The two that didn’t sink in the water appeared to have underdeveloped embryos.

After soaking I placed the Camelot seeds in FCN FlexiPlugs leaving their flags sticking out. (Soaking Plumeria Seeds) After soaking for 4 hours, 68 out of 70 seeds passed the viability test. Usually, a viable seed will soak up enough water to cause them to sink to the bottom of the container. The plumeria seed embryo is the part of a seed that contains the earliest forms of a plant’s roots, stem, and leaves. The two that didn’t sink in the water appeared to have underdeveloped embryos.

This year my experiments are one to determine the benefits of correcting pH and two to determine if growing seedlings in nutrient saturated FlexiPlugs until time to transplant into pots is beneficial.

Similar to or maybe a version of hydroponics.

Day 1, 2/16/2019

Camelot Plumeria Seeds in FCN FlexiPlugs
Day 1, 2/16/2019
Plumeria Seeds in FCN FlexiPlugs
Day 1, 2/16/2019
Plumeria Seeds in FCN FlexiPlugs
Day 14, 3/3/2019
Hope Seedling in FCN FlexiPlugs

Hope Seedling in FCN FlexiPlugs. What I look for when evaluating my seedlings. When seedlings have a dark trunk, dark leaves with dark veins in the leaf, I believe they have a greater chance of having a colorful flower. Of course, there is no guarantee. This seedling was 19 Days old on 3/7/19 and about 3″ tall.
Camelot seedlings, March 17th, 2019. 29 days Old, time to start transplanting.

Camelot seedling, March 17th, 2019, After 29 days I’m starting to see roots emerge from the plugs.
2019 Project – Planting and Growing Plumeria from Seeds

Soaking Plumeria Seeds

This is a method I’m using to start the first batch of 70 Camelot seeds this year on Feb. 16th, 2019. From the first double pod to open this year at 9:30 AM. I filled one of Kay’s plastic containers about half full of hot tap water (not so hot that I couldn’t hold my finger in it). FYI, We are on well water. The seed will absorb hot water quicker and it adds some heat to the germination process. The seeds are less than 2 weeks old.

It all comes down to water’s viscosity. Cold water is more viscous than hot water, which means that its molecules more readily cling to one another. When water is heated, the water molecules begin to move around much more rapidly, keeping them from clinging together and making the water runnier, that is, less viscous.


Camelot plumeria seeds put on to soak in sealed container with hot water.

Plumeria seeds after 2 hours soaking in sealed container, water still warm.

The third picture is after 3 hours of soaking. Only a few left floating…I knew two very thin ones looked like they would not be viable.

The Camelot seeds are fresh, less than two weeks old. Older seeds will take longer to absorb enough water. I like to soak a minimum of 4 hours, (overnight is good) especially if they are 3 years old or older seeds. When I plant for rootstock, I do not soak them.

Next: Planting Plumeria Seeds in FCN FlexiPlugs

Soaking Plumeria Seeds

Named Plumeria Seedlings

Plumeria we have grown from seed and named.

Plumeria Seed Selection

Plumeria seeds are fun to grow and can provide you with many years of pleasure. Before you begin you should consider seed choices and the limitations of your growing environment and conditions. Something to remember, Plumeria Rubra seeds do not grow true to their parents and they will take up lots of space and attention until they bloom. The average time to bloom is from two the three years, some shorter and some can take much longer.

Plumeria seeds in open seed pod.

Choosing the Right Plumeria Seeds

Before exploring how to best grow your plumeria seeds and seedlings, start with the right seed. If you intend to grow for grafting rootstock or you want to grow a new cultivar, you should use the best quality plumeria seeds possible.


Planting seeds to grow a new cultivar

Growing seedlings in the hope of getting new spectacular seedlings the most exciting journeys you can have with plumeria. Caring and babying of your seedlings for year after year waiting until it is old enough to bloom is a true labor of love. The anticipation when you see the first inflorescence starting to form is off the charts! If the flower turns out to be just like so many others, it is such a letdown, but you are ready to move on and plant more. But, in that rare case, your plumeria flower turns out to be a world-class spectacular flower, then it’s all worth it and you are ready to plant more. Did I mention that growing plumeria seedling IS very addictive?

Over the past 20 years, I have grown seedlings hoping to get that spectacular plumeria with some success. After joining Florida Colors in 2012 I have been fortunate to be able to dramatically increase my love for growing seedlings by growing several thousand each year for future plumeria.

What I’ve learned about seed selection while growing seedling for new cultivars:

  • Choose potential seed parents that have the characteristics you are hoping for in your seedling. 
  • Obtain seeds from trusted growers.
  • Get to know as much as possible about the pod and pollen parents as possible.
  • Find out as much as possible about what plumeria was growing next to the pod parent.
  • Do your best to research and find out if the parents have produced any good seedlings.
  • Always find out how old the seeds are. The older the seed the less of a germination rate. The germination rate depending on how old they are, how they were stored, the health of the pod tree, when and how they were harvested, and of course the cultivar.
  • Select seeds that look healthy and are not paper thin.
  • I have noticed over the last 4 years that the dark seeds seem to produce the darker seedlings.
  • Note: Seedlings with dark leaves and/or darker trunks have a better chance of producing flowers with color.
  • Note: Even the darkest seedling may produce a white flower.

Planting seeds for grafting rootstock

Growing seedlings grafting: Grafting a known plumeria cultivar onto a seedling with a superior root system is about the only way you can improve an existing plumeria cultivar. The rootstock will not cause any effects on the characteristics of the plumeria. All the characteristics above the ground, flowers, fragrance, growth habit and other characteristics will remain the same. Grafting a plumeria known to typically have weak root systems on a strong seedling root system will allow the plumeria to benefit greatly. The stronger the root system allows more nutrients to be absorbed, giving it a better chance to fight off disease and a better chance of survival. Typically seeds grown for rootstock will be allowed to grow for 1 to 3 years before being used for grafting.

Over the past 40 years, Florida Colors Nursery has grown over a hundred thousand seedlings for grafting purposes.

What we have found about selecting seeds for rootstock:

  • Seeds from pod parents with strong vigorous root systems, typically produce seedlings with a good root system.
  • Seeds from pod parents with light-colored flowers, typically produce good rootstock.
  • Seedling with light-colored stalks, leaves, typically have good root systems and are good for rootstock.
  • Dark-colored seeds will produce darker colored stalk and leaves and are typically not good for rootstock.
  • Seedlings with dark stalks and/or leaves, typically have the greatest graft failure rate.
  • Seedlings that are small and slow-growing typically are not good for grafting.
  • Of course, multi-branched and seedlings that branch a lot are typically not good for grafting.
  • And young green seedlings are typically not good for grafting.

Notice I use typically on every line because there are always exceptions to the rule when it comes to Plumeria.

2-2-2018 – Planting Seeds Project Update

2-2-2018 Update, Starting with the Basic Project Details.

Plumeria Seed Pod ready for plantingPlanting seed weather in Homestead looks good enough to start my seed planting and seedling projects. The forecast says the lows are going to be around 60 and the highs around 80 for the next two weeks. This is the earliest I’ve planted plumeria seeds outdoors. They will be in full sun open to the weather. It will be interesting to see how they do. I expect them to take longer than my normal to germinate. I will be planting some more around March 1, to see if there are differences. 

Here is the updated list of seeds I’m planning on planting. The ones in bold, I waiting on fresh pods to open. I always try to plant all the seeds in a pod, if possible.

Gina, Hope, Jackie, Metallica, Super Round (J115), Jack’s Purple, Dwarf Singapore Pink, Mardi Gras, Aztec Gold, Waimea, Bonnie Fox, Raspberry Sundae, Salmon Jack….so far!

Materials Needed:
Plumeria Seeds, something to soak the seeds in, 2” x 3” Gro-Tech FlexiPlugs and trays, Vitazyme, Carl Pool’s Root Activator, Bioblast 7-7-7, Pro-Mix BX Mycorrhizae, Excalibur VI 11-11-13, Metal Labels or plastic plant markers and permanent felt tip marker.

OK, the bench cleared off, containers and trays cleaned, plugs on to soak and organized the materials and products I use to germinate the seedlings. The plant is to start soaking seeds on Saturday.

I’ve decided to try several methods to see if they make any difference and to give you an idea which will work for you.

Basic Planned Regimen for 2018 Seed Projects –  substituting Pro-Mix BX Mycorrhizae mix for FlexiPlugs

The trays I use have 36 compartments, so most of the trays will have 36 seeds in each with 2″ x 3″ compartments. I will be comparing germination and growth differences between the FlexiPlugs and using ProMix soil.

Phase I – Soaking the Seeds before Planting

Plumeria seeds need moisture and warmth to germinate. They do not require light to germinate.

  1. First Dip seeds in a mix of Vitazyme and warm (not hot) water and allow to dry before proceeding.
  2. Soak seeds in warm water until plump, about 2-4 hours, overnight is ok. A good rule of thumb: Seeds that sink after absorbing water are usually viable. Seeds that float are normally not viable. Soaking seeds gives them a head start and a good way to checks viability.
  3. I sometimes use the paper towel method for germination.
    1. Place the seeds between two paper towels, wet the towels, put in a warm place, keep the towels moist and do not let them dry out. When you see roots it is time to plant the seed. 
      Caution: It’s important you do not continue to soak after roots start showing. They should be put in soil or plugs at that point. Waiting will only increase the chances of damaging the roots. Do not allow the seeds to dry out. 

Phase II – Soaking and Preparing the Plugs and ProMix.

  • Soaking Plugs: Materials: 2″ x 3″ FlexiPlugs, 36 holes Plug Tray for 2″ x 3″ Plugs, Two flat trays to hold the FlexiPlug trays. (one with drainage and one without), Vitazyme and Root Activator.
    • Soak plugs in Vitazyme (1 oz. per Gal) and Root Activator (2 oz. per gal) Soak for 1 to 2 hours.
    • Place the plugs in the trays, then plant the seeds in the FlexiPlugs with the flags and deep enough to cover the body of the seed with the flag sticking up and above the soil and water well.
    • Place ProMix soil in the trays and gently tamp until firm, plant the seeds in the ProMix with the flags and deep enough to cover the body of the seed with the flag sticking up and above the soil.
    • Water well with leftover Vitazyme and Root Activator mix. 
  • Drenching the Soil: Materials: ProMix, Same 36 holes Plug Tray used for 2″ x 3″ Plugs, Vitazyme and Root Activator.
    Because the 2″ x 3″ plugs aren’t readily available, I’ve decided to test using the ProMix in the Plug Tray instead of the plugs.
     

    • Fill the plug tray with ProMix soil and gently tamp until firm
    • Fill a Plug Tray flat without out holes about 2/3 full with Vitazyme (1 oz. per Gal) and Root Activator (2 oz. per gal) 
    • Place the Plug Tray filled with ProMix into the tray without drain holes. Allow to Soak for 1 hour or so.
    • Lift the Plug tray and allow to drain some, then place the tray with the plugs in a tray flat that has holds.
    • Plant the seeds in the ProMix soil deep enough to cover the body of the seed with the flag sticking out above the soil.
    • Water well with leftover Vitazyme and Root Activator mix. 
  • Using 10″ x 16″ x 3″ Flat Trays: Materials: Seeds, Seedling soil mix, Plug Tray, Vitazyme and Root Activator.
    • Fill a flat tray with good drain holes or slots about 2/3 full of good seedling soil.
    • Water well with Vitazyme (1 oz. per Gal) and Root Activator (2 oz. per gal) 

Phase III – Planting the Seeds

  • Labeling Trays: Before you start planting your seeds be sure to prepare labels and be sure to label every group of seeds with a minimum of the date and cultivar. Create a label for each individual seedling you are planting. 
  • Growing plumeria from seeds for new cultivars and/or rootstock.
    • Growing Seeds For New Cultivars: Materials: Seeds, 2″ x 3″ FlexiPlugs, Plug Tray, Vitazyme and Root Activator.
    • Plant the seeds in ProMix soil deep enough to cover the body of the seed with the flag sticking out above the soil.
    • Water well with leftover Vitazyme and Root Activator mix. 
  • Growing Seeds for Rootstock: Materials: Seeds, Seedling soil mix, Plug Tray, Vitazyme and Root Activator. 
    • Using the flat tray from above, place the seeds horizontal (flat) on the soil and cover with an additional 1/2″ or so of soil.
    • Water well with a Vitazyme and Root Activator mix.

Place in a sunny location, If your nighttime average 60 degrees or above at night you are safe to put the seeds outside. Seeds will germinate and grow best in Springtime and early Summer. Warmer weather helps germination, but the soil over 95 degrees could slow down germination. `The hotter the weather to more often they will need watering.  I think full sun is the reason I’ve had almost no problems with damping off or seedling rot. Caution: In hot regions, you may need some shade

Watering your seeds

  • Keep plugs very moist. 2-3 times a day. The FlexiPlugs are foam injected peat plugs, that have proven to provide great air circulation even when wet and the plumeria seeds grow great. Although decomposition takes much longer than normal plugs, I feel it is worth the trade-off. 
  • For the ProMix in plug trays and the flats, water twice a day to keep the soil moist. Do not allow the soil to dry out.

Seed Germination – your seeds will germinate in 5-15 days, depending on the cultivar, the method used and the growing conditions.

Phase IV – Young Seedlings

After Germination, the seeds will put out roots, the seed leaves (Cotyledon) will break the surface and the seed coat will fall off and true leaves with start growing.

The seed leaves (Cotyledon) contain nutrients to help keep seedling alive until the roots can grow enough to start providing nutrients and until the real leaves have grown to perform photosynthesis to process the nutrients. 

After 3 or 4 real leaves have grown, foliar feed with Bioblast (1 tablespoon per gal). Remember when the seed leaves go away the seedling will need a source of nutrients. Caution: Apply only Early or Late in the day, not in strong sunlight, it may burn the leaves.

Phase V – Transplanting

Materials: ProMix or Seedling soil mix, 2 gal pots, 7 1/2 gal squat pots. Vitazyme and Root Activator, Excalibur and a Moisture Meter

Create a label for each seedling and be careful to label correctly with a minimum or the date planted and cultivar. We put the letter “S” on the tag to clearly indicate it is a seedling.

When you see several roots coming out the bottom and/or sides of the plug or tray it’s time to transplant. 

When transplanting I fertilize with Excalibur IX 11-11-13 (3 tablespoons for 2  pot and 5 tablespoons for the 7 1/2 gal pots) Mix in top 1” of soil to cover fertilizer granules. I suggest 9 months because you can apply again in 9 months providing nutrients all year long. Caution: If you can’t keep the seedling growing all year long, or depending on your growing season, it may be better to use Excalibur IV and apply twice a year.

Be sure the Plugs are completely covered by soil, this will help them to decompose and prevent premature drying out.

This year, I plan on transplanting the 2″ x 3″ plugs to 2 gals and 7 1/2 gal squat pots. I’m expecting the 7 1/2 gal pots may help the growth rate.

Soil mixtures:

  • I’m using Pro-Mix BX Mycorrhizae for the soil mix for growing seedlings for new cultivars.
  • A good seedling mix is good for growing rootstock.

Water well after transplanting with a mix of Vitazyme and Root Activator.

Phase VI – Extended Fertilizing and Care

Materials: Excalibur VI or IX, BioBlast and a Moisture Meter

Foliar feed every two weeks with a mix of BioBlast (1 tablespoon to 1 gal of water) and Vitazyme (2 tablespoons to 1 gal of water), early or late in the evening.

If possible keep seedlings growing for the first year by keeping in a warm, sunny location. Additional Lighting may be needed.

Water as needed, allow the pot to almost dry out and water well making sure all the soil is evenly watered. Do not allow to bet completely dry. A moisture meter is always a good tool to have.

Optimizing Seed to Seedling Growth

My 2018 projects are designed to determine how to speed up the growth of seeds and seedlings to the point of maturity without causing them to grow excessively tall and lanky. The goal is to grow seedlings to maturity and produce blooms as soon as possible. It is important to understand all about the Plumeria seeds and seedlings growing habits and of course the limitations. Using different products, strength and methods can produce different results at different stages during the growing period and in different growing environment and conditions. I’ve experimented with many growing methods and products to determine what works best for me. A short cut would be finding someone in your area and start with what they have had success with and see if it’ll work for you. 

Plumeria are Dicots (Two-seed Leaves)

The primary root, called the radicle, is the first thing to emerge from the seed. The primary root anchors the plant to the ground and allows it to start absorbing water. After the root absorbs water, the shoot emerges from the seed. In dicots, the shoot has three main parts: the cotyledons (seed leaves), the section of the shoot below the cotyledons (hypocotyl), and the section of shoot above the cotyledons (epicotyl). The way the shoot emerges from soil or growing media follows two main patterns. In plumeria, the section of the shoot below the cotyledons elongates and forms a hook, pulling the cotyledons and the growing tip through the soil. Once it reaches the surface, it straightens and pulls the cotyledons and shoot tip of the growing seedlings into the air. This is called epigeous germination. 

After the shoot emerges, the seedling grows slowly while the storage tissue of the seed diminishes. Soon, the plant develops a branched root system or taproot. Then, true leaves that look like the leaves of the mature plumeria appear. These leaves, unlike cotyledons, photosynthesize light into energy, allowing the plant to grow and develop. When the true leaves start converting light into energy, the seedling needs a source of nutrients.

How Plumeria Seeds Form and Germinate – Before You Start Growing Plumeria From Seed

 About Plumeria Seed Selection

Optimizing Seed Germination

We know that plumeria seeds need optimal amounts of water, warm temperatures to germinate. If we don’t create the most optimal environment possible, then plants tend to germinate slowly and unevenly. Generally, space is limited, so we want plants to germinate as quickly as possible. Uneven germination can also cause problems. If you have ever had to transplant a flat of seedlings where half are ready to plant and the other half are too small with root balls that don’t slide easily out of their cells, you will understand why. Damage to roots can cause a setback in the growth of the seedling.

One common option to achieve optimal germination temperature in growing media is to use germination mats. These mats allow you to set the temperature according to seed requirements. For Plumeria I’ve found 85 degrees or above seems to be good. Plumeria will germinate in 7 days at 85°F but may take more than 15 days to germinate at 65°F.

Make sure you maintain optimal temperatures for your plumeria seeds. It is also critical to promote air circulation to mitigate fungal pathogens such as those causing damping off. I’ve been growing outside in the sun with very little dampening off problems. 

Starting Seedlings in Plugs 

Additional information about seeds and seedlings is available on Plumeria Care

Optimizing Seed to Seedling Growth

Typical seedling growth after 12 day in Plugs

Typical seedling growth in tray after 12 days

The optimal temperature for growing seedlings may be different from seeds. Remember, the optimal temperature will stimulate optimal growth. Cooler temperatures generally slow down growth, and warmer ones speed up growth to a point. 

Temperature and time required for growing Plumeria seedlings to transplanting size using FlexiPlugs. Day (F) 75-90, Night (F) 60 or above, Time 15-20 days. I plan on transplanting to pots when I see plenty of roots and three or four real leaves. The photos show seedling at 12 days, the roots are there, but they need a few more leaves.

Over the last four years, I’ve been experimenting with different media for seeds and seedlings. I’ve determined the 2″ x 3″ FlexiPlugs are the best choice for my growing conditions. They give me the ability to water 3 or more times a day and the plugs still provide adequate oxygen to the roots. I soak the FlexiPlugs in Vitazyme and Carl Pool’s Root Activator and the plug does a good job of holding the nutrients. The plugs also provide the best way I’ve found to allow transplanting with minimum root damage. The only issue I found is the slow decomposition rate of the plugs, but I haven’t noticed any negative effects on the growth of the seedlings.

As the seeds germinate and the seedlings grow, it is important to keep the plugs moist by watering less often but longer to accommodate developing root systems. I check my seedling several times a day by pressing the top of the plugs with my finger to check for moisture. If they don’t feel moist or if they look a little dry, I will water. Remember to carefully monitor and water the plants at the edges of trays. They dry out faster than those in the middle. Something else I like about the FlexiPlugs, I actually watered the Plugs every hour or so during the day for 4 days, the seedlings did fine.  But you should remember using some other methods, overwatering can increase the probability of plumeria developing damping off or stem rot.

Why Use FlexiPlugs

Fertilizing Young Plumeria Seedling – About Growing Plumeria Seedlings

Additional information about seeds and seedlings is available on Plumeria Care

Optimizing Seed to Seedling Growth

About Growing Plumeria Seedlings

Growing plumeria from seeds can be a rewarding and exciting way to add new cultivars to your collection. But in order to grow plumeria from seed you must know something about caring for plumeria seedlings. 

If you germinate you seed between wet paper towels or use other methods of germination other than planting straight in plugs or soil, you should plant the seedling as soon as you see a root. Leaving them too long or allowing them to dry out could damage or even kill the new seedling. 

A seed turns into a seedling as soon as it germinates. When you plant a seed, the first leaves to emerge are the cotyledons. These leaves will look different from leaves that will grow later. The purpose of these leaves is to provide stored food to the seedling for a short period of time. True leaves grow shortly after the cotyledons. When your seedling has three of four true leaves it need light to start generating energy through photosynthesis that will help feed the plant for the rest of its life.

Common Questions

  • How much water should my seedling get?
    Watering is very important, you should keep the soil moist but not wet. In the sun small pots will dry out very quick. As you transplant into larger pots the soil will be able to hold more water and watering is needed less often.
      
  • When do I transplant my seedlings?  
    Transplanting seedlings at the proper time is crucial to their development later on. If you transplant them before they are ready, they may have a hard time surviving. If you wait too long, your seedlings growth may be slowed down or become pot bound in its original container. When it comes to how to transplant seedlings, there is no hard and fast rule to how tall a seedling should be before you transplant or put outside in the garden, due to the fact that different plumeria grow to different sizes. A general rule is when a seedling has three or more true leaves and you see roots coming out of the bottom of the pot, it’s large enough to transplant or place out in the garden (after it has been hardened off).Making sure that the plant has enough of these leaves to keep it sustained when planted out in your garden is important to its proper growth. Just remember, it isn’t how tall but how many true leaves your plant has that will determine when you should be planting seedlings out. But even when your seeds are big enough to plant out, make sure you harden off your seedlings before planting them. 
     
  • When and how to fertilize seedlings?
    When the seedling has true leaves and roots it is capable of absorbing nutrients from the soil or from fertilizer. When cotyledons are gone, the seedling needs other sources of nutrients. We recommend adding a balanced slow release fertilizer, such as Excalibur to the soil or spray with a foliar fertilizer such as Bioblast at half strength. More info on Nutrients and Fertilizer
      
  • What size pots are best for my seedlings?
    Start with a small sized pot and transplant into larger pots as your root system develops. Transplanting or starting with a 4″ pot will allow plenty of room for the roots and provide the pot to almost dry out between watering. When you see roots coming out of the pot it is time to transplant to a 1 gal pot. Do not allow the roots to become root bound in the pot. If you slip a couple of pot sizes and go to a much larger pot, the soil will have harder time dissipating the moisture and heat has less chance of helping the roots grow.
       
  • Can I plant my seedling in the ground?
    Spring is the best time to plant in the ground, after the last frost and best when the night time lows are above 60s. Planting in the ground is a good idea as soon as they have established a good root system.  I would allow to grow to minimum of 18″ before putting them in the ground. At that point you can treat your seedling as you would mature plumerias. They still need a supply of nutrients, good sun, good soil with good drainage. Some use raised beds to allow the benefits of the in ground space for the roots to grow. Just remember to protect from cold and to provide plenty of room to grow. 
       
  • What soil is best for my seedlings?
    When preparing to transplant you need to get quality soil for seedlings. The soil is the key to success with any plumeria and should give your seedling the optimum growth. Any good soil suggested for seedling is ok, but the best soil I have found is ProMix BX with Mycorrhizae. The soil must be well draining no matter what soil you use.  

Germinating Plumeria Seeds

Germinating Plumeria Seeds: An In-Depth Guide to Successful Seedling Development

Introduction

Germinating plumeria seeds is a process filled with potential and excitement. Each seed holds the genetic blueprint for a unique plumeria plant, capable of bringing beauty and fragrance. This comprehensive guide delves into the best practices for germinating plumeria seeds, ensuring successful growth from seed to seedling.

Breaking Seed Dormancy

  • Importance of Warmth and Moisture: Plumeria seeds require warm temperatures and moisture to break dormancy. The thick seed coat needs to be softened for germination to occur.
  • Methods: Soaking seeds in warm water or scarifying them can help weaken the outer coat, facilitating water absorption.

Seed Germination Medium

  • Choosing the Right Medium: A “seed starting mix” is ideal for plumeria seeds, often containing a moderate level of elemental fertilizer beneficial for sprouting seedlings.
  • Growing Trays and Containers: Select the type of tray or container that best fits your space and quantity of seeds. Individual chambers in trays can minimize transplanting needs.

Temperature for Germination

  • Optimal Range: Most plumeria seeds germinate effectively between 65-90 degrees Fahrenheit. Additional warmth in the growing medium can speed up germination.
  • Heat Pads and Lighting: Using heat pads or supplemental lighting like T5 fluorescent bulbs can provide the necessary warmth.

Preparing for Germination

  • Soaking Seeds: Soak the seeds overnight in a warm place to initiate the germination process.
  • Moistening the Medium: Ensure the medium is moist but not waterlogged before planting the seeds.
  • Spacing: Space seeds about an inch apart to minimize root damage during transplanting.

Managing Environmental Conditions

  • Light: Once seedlings emerge, they require a sufficient light source for photosynthesis. Avoid direct sunlight through windows to prevent leggy growth.
  • Humidity and Airflow: High humidity can hinder transpiration, while good airflow is essential for carbon dioxide and oxygen exchange.
  • Temperature: Maintain the optimal temperature for seedling growth and monitor for damping off, a condition caused by excessive moisture.

Seedling Development

  • Dicotyledonous Nature: Plumeria seedlings, being dicots, emerge with a primary root (radicle) followed by the shoot. The cotyledons (seed leaves) initially provide nutrients, and then true leaves appear for photosynthesis.
  • Epigeous Germination: Plumeria typically follows epigeous germination, where the shoot emerges above the soil.

Fertilization and Transplanting

  • FlexiPlugs: These have shown to be effective in providing adequate oxygen and moisture, as well as minimizing root damage during transplanting.
  • Light Fertilization: Light fertilization may be necessary as the growing medium’s nutrient charge depletes.

Conclusion

Germinating plumeria seeds is a process that requires attention to detail in terms of temperature, moisture, light, and the growing medium. With proper care and environmental management, each plumeria seedling can reach its full potential, contributing to the diverse and beautiful world of plumeria plants.

Further Resources

For more information and expert advice on plumeria seed germination and seedling care, visit Plumeria.Care. The website offers a wealth of articles and resources from plumeria experts worldwide, providing invaluable insights into the nuances of plumeria cultivation.

About Plumeria Seeds

Plumeria Seeds

When germinating plumeria seeds at home or in a greenhouse, the first thing to remember is plumeria seeds may be started indoors but should be transplanted and moved to a location that provides plenty of light as soon as it has 3 or 4 real leaves. Leaving a seedling in small containers may result in disrupted growth, which can lead to unfavorable results. However, starting plumeria indoors is a great way to get an early jump on the outdoor growing season. When choosing a medium in which to germinate plumeria seeds, look for one that says something along the lines of, “seed starting mix.” This type of growing medium will likely have a moderate elemental fertilizer charge, which will benefit the newly sprouted seedlings. Seeds can be germinated in many different styles of trays and containers, so choose the type that best fits your space needs. If starting just a few seeds, a simple, flat starting tray or small individual containers will work great. When planting many seeds at once, it may be wise to use trays that are divided into separate growing chambers. This will cut down on the amount of transplanting needed as the plants grow. Remember, all a plumeria seed needs to germinate in warm temperatures and moisture. Some growers do use heat pads underneath the starting trays. Most plumeria seeds will germinate at temperatures between 65-90 degrees Fahrenheit and the added warmth in the growing medium can speed up the germination process. Using supplemental lighting, like a T5 fluorescent bulb, can also help provide extra heat. Though seeds may not need light in order to germinate, the seedling will need light, so having a light source ready is a good idea. I would use caution when starting seeds in a bright window sill because direct sunlight through glass can alter the intensity and the seedlings may stretch and become ‘leggy.’ (There are many good plumeria seed germination methods, I suggest you research each one and use the one or ones that fit your situation.)

When preparing to germinate seeds indoors it is a good idea to soak the seeds overnight or at least 4 hours in a warm place. Moistening the growing medium before planting any seeds. This will help to ensure that the medium is not over saturated or water-logged and that the moisture is spread evenly throughout. Using a tray, spread the seeds so they have about an inch between each, this will help minimize the root damage when transplanting.  I have found using plugs is much easier to handle and preserves the roots when transplanting. There are many good planting methods and you should examine each to see which fits your situation and may help result in higher germination rates. If planting is occurring in a flat starting tray, space seeds at least an inch apart, either in rows or in a grid pattern and cover lightly with 1/4″ of growing medium (remember oxygen is important during germination, so don’t pack the medium down to much). Then, spray the entire tray lightly with a hand-held mister. The soil should be kept moist, not wet long enough for the seeds to germinate, it may need to be sprayed with the mister occasionally to maintain even distribution of moisture. Some growers use starting trays that have plastic, hood-type lids. This will keep the humidity around the seeds at higher than average room levels and may help increase the chance of successful germination. Be sure to check the seeds daily to maintain an optimal environment.

Environmental Considerations

As the plumeria seedlings begin to pop up through the soil, there are a few environmental aspects that should be given proper attention right away: light intensity, humidity, and airflow. Remember the seeds of different cultivars may germinate in different lengths of time. Usually, plumeria seeds will germinate in 5-10 days, but I have seen it take up to 30 days if conditions aren’t right. Plumeria seeds can sprout in total darkness, but, once the seedling breaches the soil, a sufficient light source is imperative. Those first “true leafs” will need a light source to perform photosynthesis and create carbohydrates, which will help sustain both normal plant growth and, most importantly, root growth. Without proper lighting, the early vegetative growth of a plant can be negatively affected and could cause long-lasting problems.

Humidity can be helpful during the initial germination process but, as the seedlings begin to grow, high levels of humidity can spell disaster. As internal processes burn up the seedlings’ energy sources, the plants will need to release oxygen as a gas through their stomata (a process called transpiration). As the oxygen leaves the plant, water and elemental nutrients are pulled up through the roots. In a humid environment, the stomata will remain closed and the roots will not take in water. If the growing medium is wet without proper aeration, the water will have nowhere to go and the roots will likely suffocate and die.

Airflow and humidity almost go hand in hand. A nice flow of air through the plant’s canopy will encourage the flow of carbon dioxide to the leaves and, subsequently, oxygen away from them. This is not just true for seedlings, but for plants in all stages of growth. A small fan on medium or low can help keep humidity levels low and the heat from any supplemental lighting to a minimum. Be sure to keep the rooting medium moist, but not too wet. Seedlings need water and going too long without can result in serious damage. However, if the medium remains too wet for too long it may impair root growth. As the seedlings grow, they will eventually exhaust any nutrient charge that the growing medium had to offer, so light fertilization may be needed while waiting to transplant into a different container.

As the seedlings grow, with proper care and attention, they inch closer and closer to fulfilling their own unique destiny. Every plumeria seed has its own DNA structure and will not be exactly like any other. As we stand by, eagerly awaiting the flowers of our labor, it is important to remember that every plumeria we grow has entered into this life as a small, almost insignificant looking thing, that so many refer to as simply, just a seed.

Before You Start Growing Plumeria From Seeds

Plumeria seeds are fun to grow and can provide you with many years of pleasure. Before you begin you should consider seed choices and the limitations of your growing environment and conditions. Something to remember, Plumeria Rubra seeds do not grow true to its parents and they will take up lots of space and attention until they bloom. The average time to bloom is from two the three years, some shorter and some can take much longer.

Choosing Plumeria Seeds

Before exploring how to best grow your plumeria seeds and seedlings, start with the right seed. If you intend to grow for grafting rootstock or you want to grow a new cultivar, you should use the best quality plumeria seeds. Coming soon….Plumeria Seed Choices.

What Do Plumeria Seeds Need to Germinate?

Viable plumeria seeds are living entities. They must contain living, healthy embryonic tissue in order to germinate. All fully developed seeds contain an embryo, a store of food reserves, wrapped in a seed coat. Seeds generally “wake up” and germinate when soil moisture and temperature conditions are correct for them to grow.

Seeds Need the Right Environment to Germinate

Temperature, moisture, air, and light conditions must be correct for seeds to germinate. All seeds have optimal temperature ranges for germination. The minimum temperature is the lowest temperature at which seeds can germinate effectively. The maximum is the highest temperature at which seeds can germinate. Anything above or below this temperature can damage seeds or make them go into dormancy. At optimal temperatures, germination is rapid and uniform, for plumeria seeds usually 5-10 days.

Plumeria seeds need correct moisture to initiate internal processes leading up to germination. In soil, this is generally about 50-75 percent of capacity. A fine-textured seedbed and good seed-to-soil contact are necessary for optimal germination. Aeration in the soil media allows for good gas exchange between the germinating embryo and the soil. Seeds respire just like any other living organism. They need oxygen and produce carbon dioxide (CO2). This carbon dioxide needs to be able to move away from the seed. If the soil or media is not well aerated due to overwatering or compaction, the CO2 will not dissipate and seeds can suffocate.

Not all seeds have the same light requirements. Most seeds germinate best under dark conditions and might even be inhibited by light. Don’t confuse seed light requirements with what seedlings need. All seedlings require sunlight. Seedlings will become leggy and fragile and will not grow to their potential if they do not have sufficient light.

Soil temperature conditions for plumeria seed germination, Minimum (F) 60, Optimum Range (F) 75-95, Optimum (F) 85, Maximum (F) 95. Soil temperatures should be taken by inserting a soil thermometer 3-4 inches deep into the soil surface and noting the temperature.

Seed Dormancy

For plumeria seeds to come out of dormancy, we have to break their physical dormancy factors. Plumeria seeds have a thick seed coat, The most common method is some form of soaking the seed in warm water. Others use scarifying (scratching the surface) the seed, artificially weakening the outer coat of the seed. Water and warm temperatures are the two factors that break plumeria dormancy.

There are several methods used to help test viability and germination of Plumeria seeds: Pre-Soaking in warm water, Soaking between paper towels overnight, soaking between paper towels in a plastic bag, planting directly into the soil, placing in styrofoam and floating in the water, planting directly into plugs, etc. They all work, the trick is to find out which method or combination of methods works best for you. Coming soon…Plumeria Seed Viability Test

Steps of Seed Germination 

  1. Imbibition. The seed rapidly takes up water and the seed coat swells and softens. The outer seed coat becomes soft and wrinkly with water.
  2. Interim or lag phase. During this phase the seed activates its internal physiology, cells respire, and the seed starts to make proteins and metabolize its stores of food.
  3. The radicle and root emergence. The cells start to elongate and divide, bringing the root and radicle out of the seed.

To find out whether or not your seed is viable, do a germination test. Wrap seeds in a wet paper towel, place in a warm spot, wait 4 hours or overnight, and count how many seeds absorb water and plump up. The ones that plump up will most likely germinate.

If you save your seed from the year before, think about this: the life of a plumeria seed can be cut in half by an increase of just 1 percent in seed moisture or by an increase in storage temperature of just a few degrees. A simple rule of thumb is to store your seed in a dry cool place.

A study was done by Eulas Stafford with the Plumeria Society of America. He gathered a large quantity of Slaughter Pink seeds and proceeded to plant 10 seeds a year for 10 years. The results: The first two years 100% germinated and after that, an additional 10% failed to germinate each consecutive year. In the 10th year, only 1 germinated. 

Early Seedling Development

Plumeria are Dicots (Two-seed Leaves)

The primary root, called the radicle, is the first thing to emerge from the seed. The primary root anchors the plant to the ground and allows it to start absorbing water. After the root absorbs water, the shoot emerges from the seed. In dicots, the shoot has three main parts: the cotyledons (seed leaves), the section of the shoot below the cotyledons (hypocotyl), and the section of shoot above the cotyledons (epicotyl). The way the shoot emerges from soil or growing media follows two main patterns. In plumeria, the section of the shoot below the cotyledons elongates and forms a hook, pulling the cotyledons and the growing tip through the soil. Once it reaches the surface, it straightens and pulls the cotyledons and shoot the tip of the growing seedlings into the air. This is called epigeous germination. 

After the shoot emerges, the seedling grows slowly while the storage tissue of the seed diminishes. Soon, the plant develops a branched root system or taproot. Then, true leaves that look like the leaves of the mature plumeria appear. These leaves, unlike cotyledons, photosynthesize light into energy, allowing the plant to grow and develop. When the true leaves start converting light into energy, the seedling needs a source of nutrients.

Managing for Optimal Germination and Seedling Development

Optimizing Germination

We know that plumeria seeds need optimal amounts of water, oxygen, and temperature to germinate. If we don’t create the most optimal environment possible, then plants tend to germinate slowly and unevenly. Generally, space is limited, so we want plants to germinate as quickly as possible. Uneven germination can also cause problems. If you have ever had to transplant a flat of seedlings where half are ready to plant and the other half are too small with root balls that don’t slide easily out of their cells, you will understand why. Damage to roots can cause a setback in the growth of the seedling.

One common option to achieve optimal germination temperature in growing media is to use germination mats. These mats allow you to set the temperature according to seed requirements. For example, plumeria will germinate in 7 days at 86°F, but take more than 15 days to germinate at 65°F.

Make sure you maintain optimal temperatures for your plumeria. It is also critical to promote air circulation to mitigate fungal pathogens such as those causing damping off.


Seedling Development

The optimal temperature for growing seedlings may be different from that for seeds. Remember, the optimal temperature will stimulate optimal growth. Cooler temperatures generally slow down growth, and warmer ones speed up growth. 

Temperature and time required for growing Plumeria seedlings to transplanting size. Day (F) 70-90, Night (F) 60-70, Time (weeks) 2-4 

It is still critical to maintain good air circulation and sufficient moisture. Generally, watering should be deeper to accommodate developing root systems. Remember to carefully monitor and water the plants at the edges of flats. They dry out faster than those in the middle. However, overwatering can increase the probability of plumeria developing damping off.

Over the last four years, I’ve been experimenting with different media for seeds and seedlings. I’ve determined the use of FlexiPlugs to be the best choice for my projects. They give me the ability to water as much as 3 times a day and they still provide adequate oxygen to the roots. They also hold nutrients and provide the best way I’ve found to allow transplanting with minimum root damage. More…Starting Seedlings in Plugs

Visit Plumeria.Care to find many articles by Plumeria experts from around the world. Follow this link for some great articles on Seeds and Seedlings.

About Plumeria Seeds