2019 Project – Planting and Growing Plumeria from Seeds

My favorite way to germinate and grow plumeria seeds.
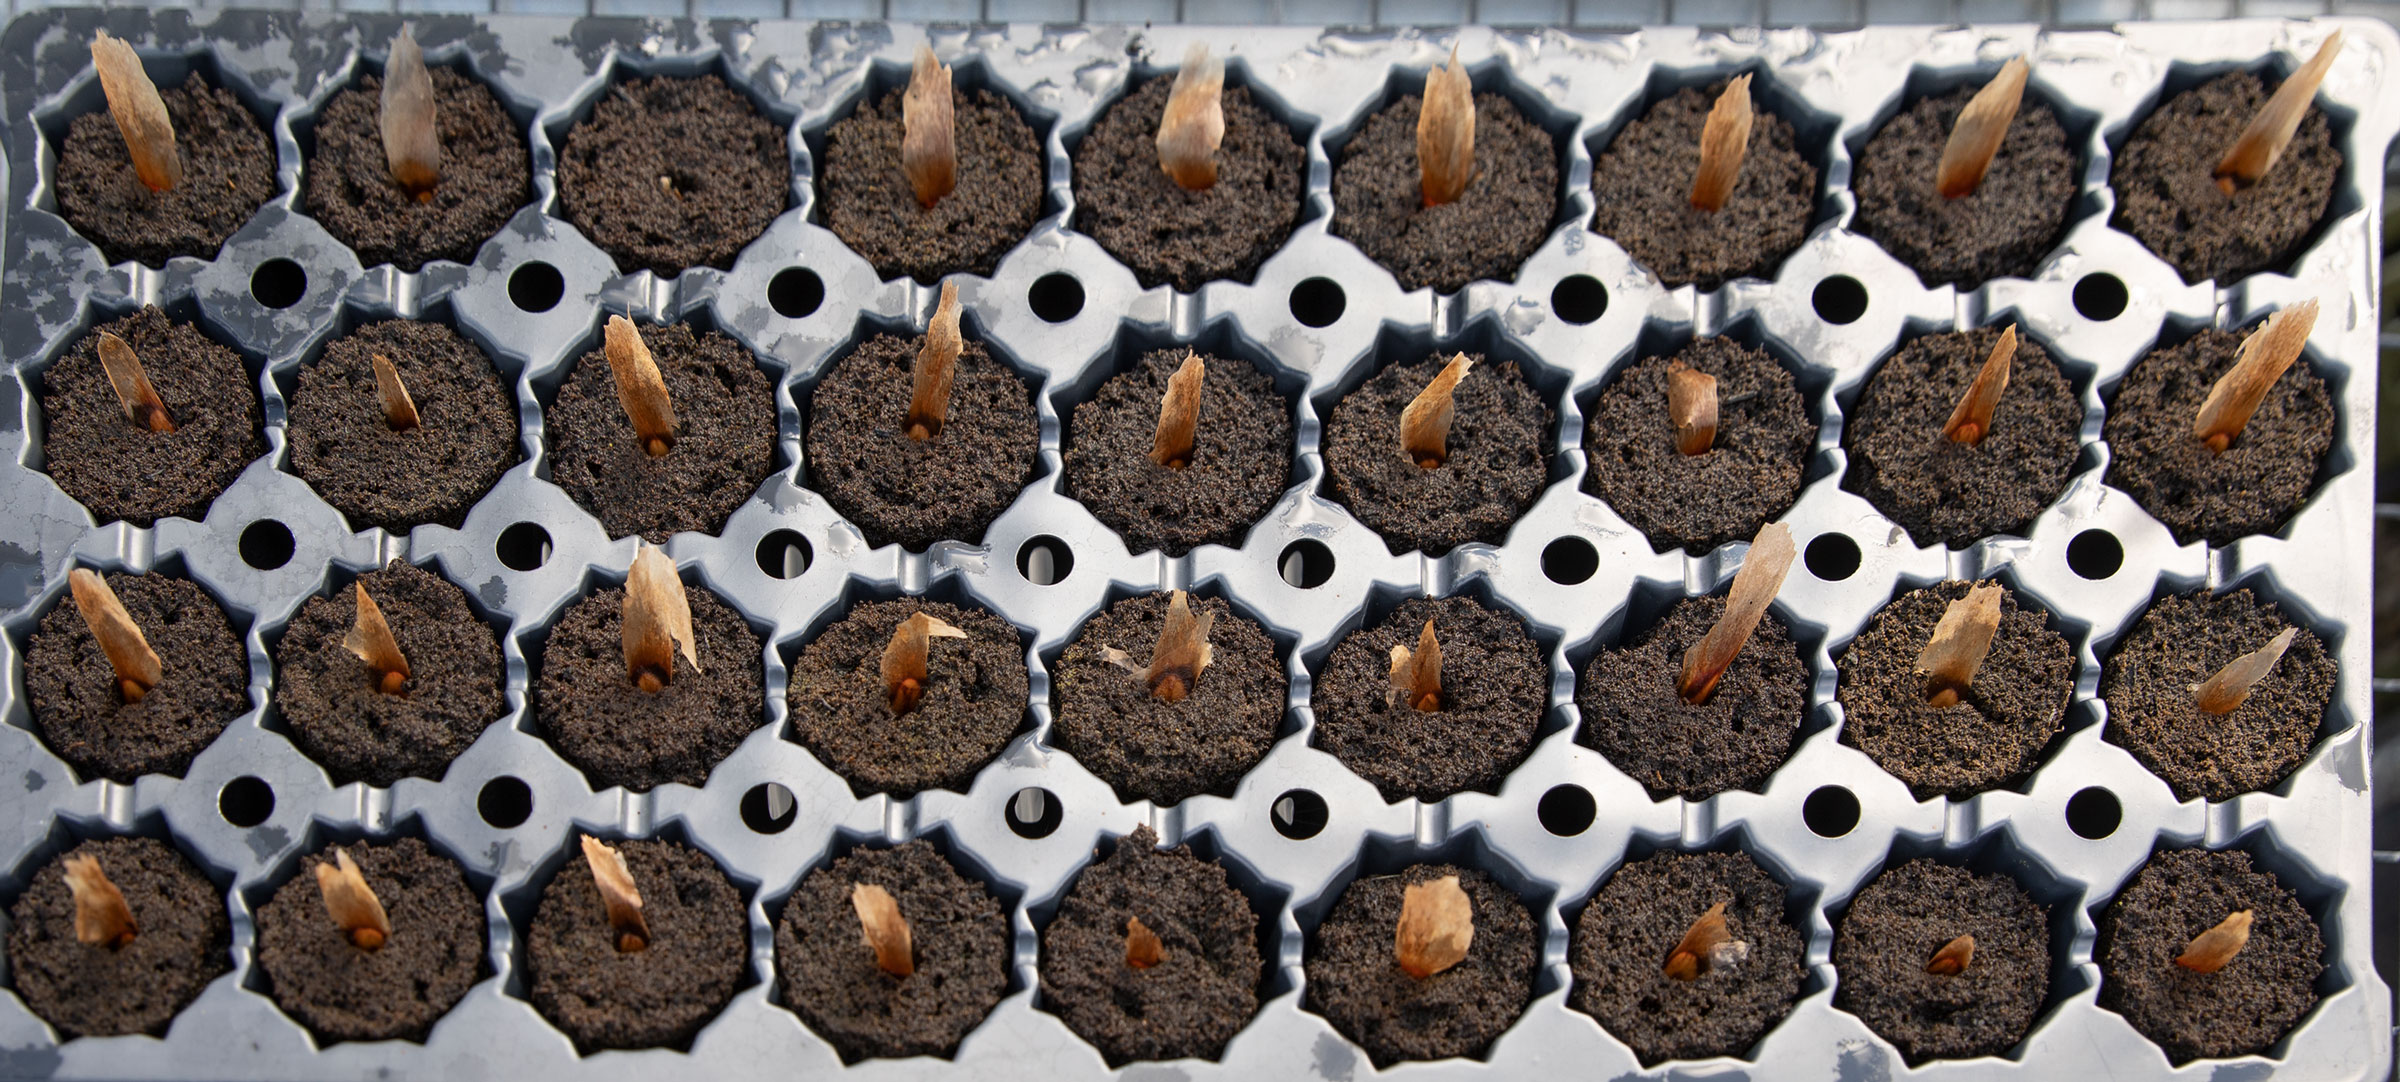
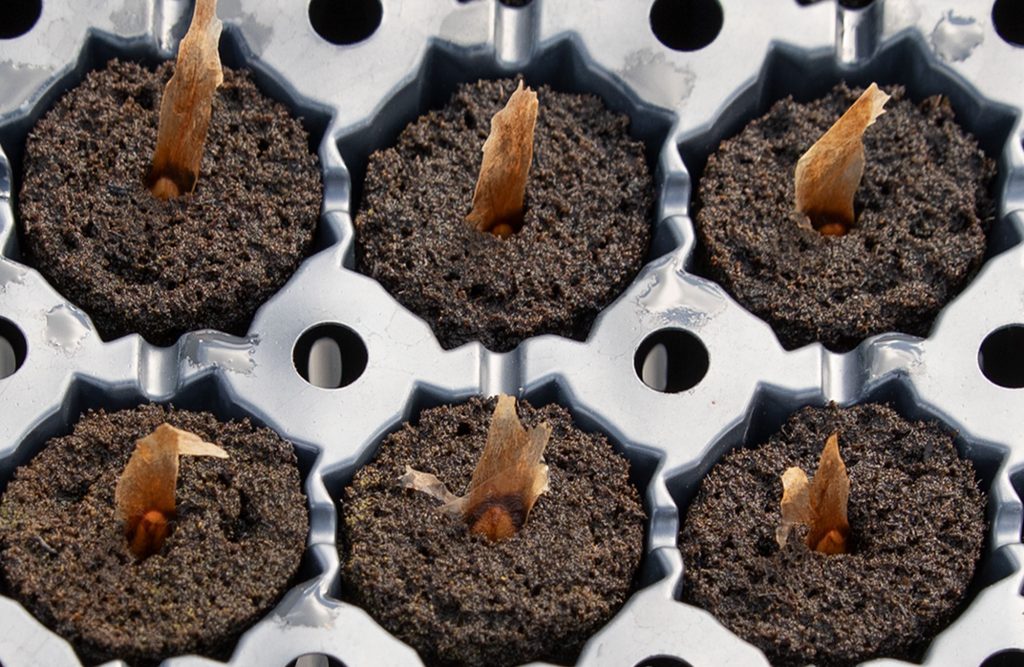
After soaking I placed the Camelot seeds in FCN FlexiPlugs leaving their flags sticking out. After soaking for 4 hours, 68 out of 70 seeds passed the viability test. Usually, viable seed will soak up enough water to cause them to sink to the bottom of the container. The plumeria seed embryo is the part of a seed that contains the earliest forms of a plant’s roots, stem, and leaves. The two that didn’t sink in the water appeared to have underdeveloped embryos.

After soaking I placed the Camelot seeds in FCN FlexiPlugs leaving their flags sticking out. (Soaking Plumeria Seeds) After soaking for 4 hours, 68 out of 70 seeds passed the viability test. Usually, a viable seed will soak up enough water to cause them to sink to the bottom of the container. The plumeria seed embryo is the part of a seed that contains the earliest forms of a plant’s roots, stem, and leaves. The two that didn’t sink in the water appeared to have underdeveloped embryos.

This year my experiments are one to determine the benefits of correcting pH and two to determine if growing seedlings in nutrient saturated FlexiPlugs until time to transplant into pots is beneficial.

Similar to or maybe a version of hydroponics.

Day 1, 2/16/2019

Camelot Plumeria Seeds in FCN FlexiPlugs
Day 1, 2/16/2019
Plumeria Seeds in FCN FlexiPlugs
Day 1, 2/16/2019
Plumeria Seeds in FCN FlexiPlugs
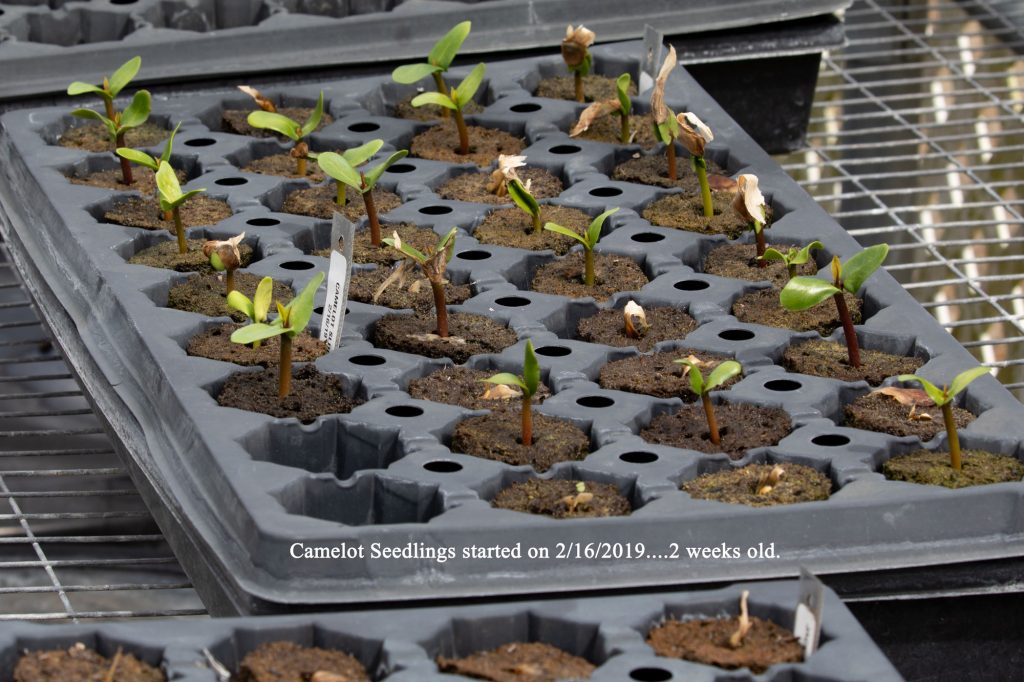
Day 14, 3/3/2019
Hope Seedling in FCN FlexiPlugs

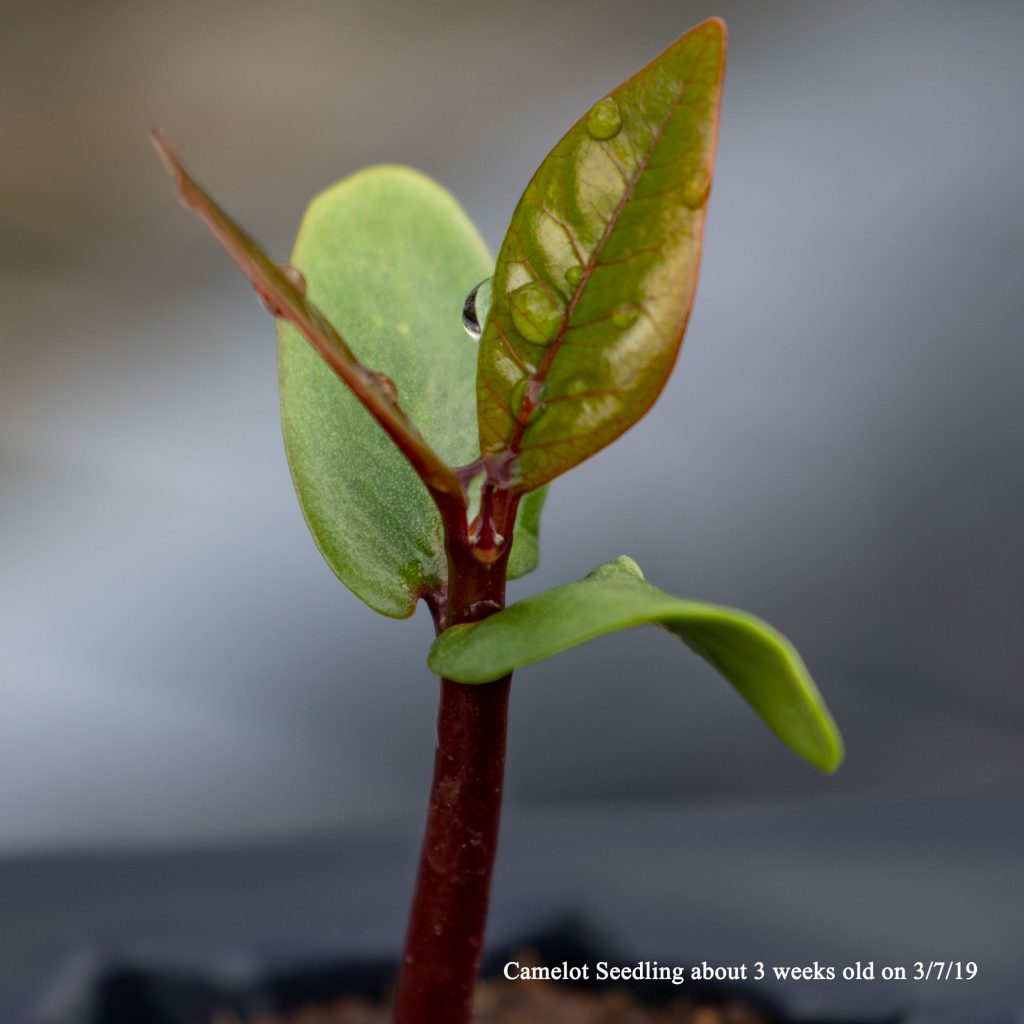
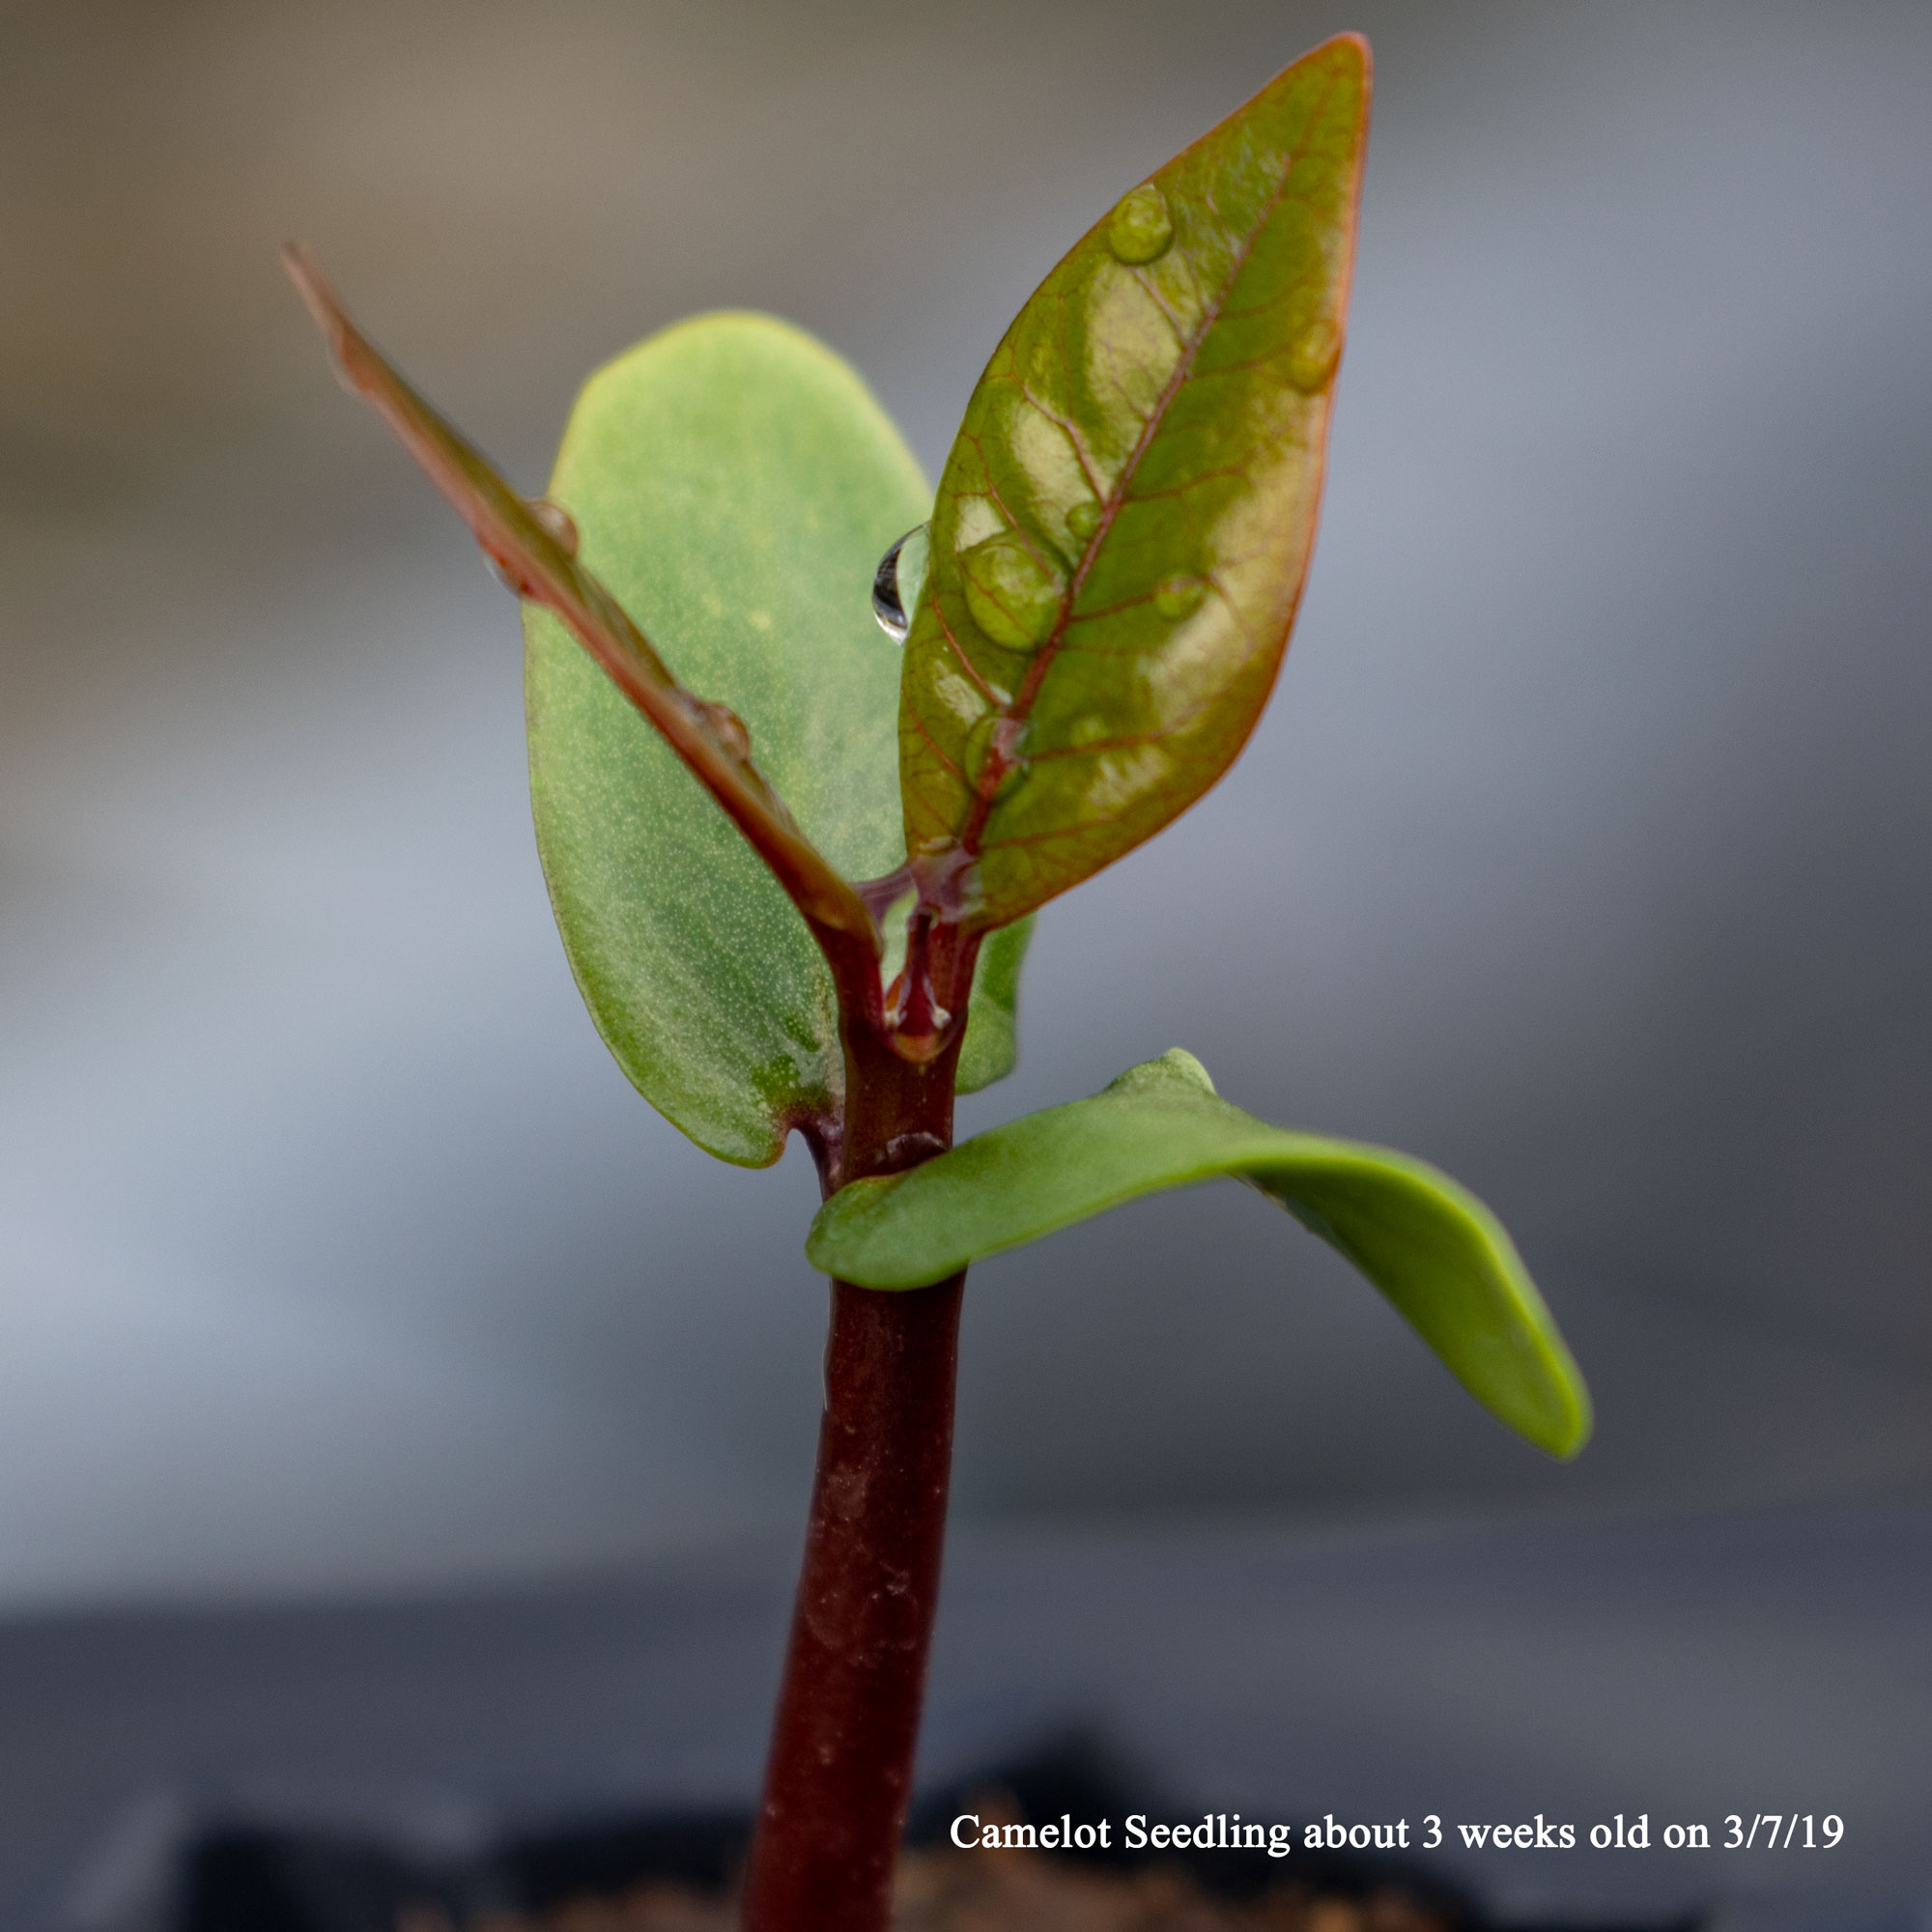
Hope Seedling in FCN FlexiPlugs. What I look for when evaluating my seedlings. When seedlings have a dark trunk, dark leaves with dark veins in the leaf, I believe they have a greater chance of having a colorful flower. Of course, there is no guarantee. This seedling was 19 Days old on 3/7/19 and about 3″ tall.
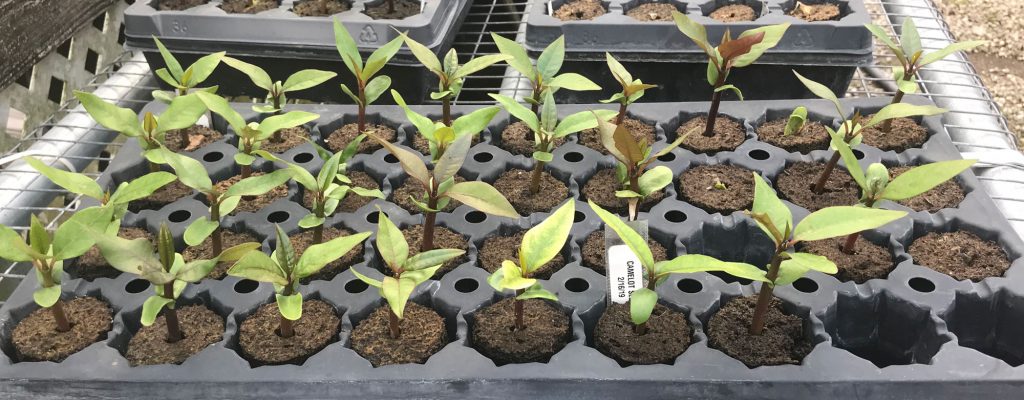
Camelot seedlings, March 17th, 2019. 29 days Old, time to start transplanting.

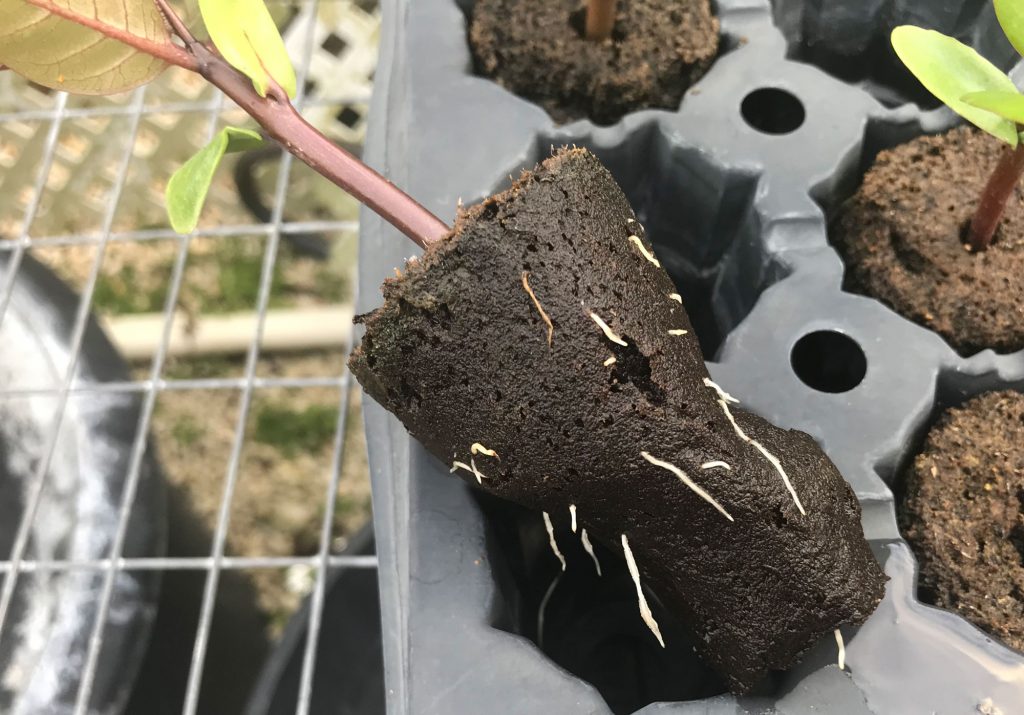
Camelot seedling, March 17th, 2019, After 29 days I’m starting to see roots emerge from the plugs.
2019 Project – Planting and Growing Plumeria from Seeds

Plumeria Seed Starter Kit

As always, we are pleased to share our experiences and technology!

I’m using the Plumeria Seed Starter Kit from FCN

After several years of experimenting with various media and products for germinating and growing seedlings, We, Florida Colors Nursery, decided to make them available on our site. The Florida Colors Nursery Plumeria Seed Starter Kit consists of a flat tray without drain holes, a plug tray and 36, pH neutral 2″ x 3″ foam injected peat plugs pre-saturated with micro-nutrients (Why I use FCN FlexiPlugs). Specific micro-nutrients have been added to promote seed germination and give young seedlings a kick start. The Plumeria Seed Germination Kit is for the serious grower who wants the most out of their seeds.

For best results always start with the freshest seeds possible. Purchase from a trusted seller known to provide quality plumeria seeds.

Nutrient Mix – 1 oz of Carl Pool’s Root Activator (Why I use Carl Pool’s Root Activator) and 1 oz Vital Earth’s Vitazyme (Why I use Vitazyme) per gal of water. The products used for the nutrient mix are products we have been using and also sell on our website, but you can certainly replace them with similar products.

Phase I – Seed Germination

If you need to test viability or speed up initial germination, you may want to soak your seeds before planting. See “How to Soak Plumeria Seeds”
https://plumeriaseeds.com/soaking-plumeria-seeds/  

There are many methods for seed germination. The method below is the best for me in my climate.

  1. Remove the plastic cover. (The tray and plugs are wrapped in plastic and sealed to keep the plugs moist.)
  2. Use a knife to make a slice in each plug, make a 1/2″ wide slice and about 2″ down into the plug.
  3. Place the seed in the slice in the plug allowing the seed’s flag to stick out.
  4. Fill the flat tray with the nutrient mix (1 oz of Root Activator and 1 oz Vitazyme per gal of water) The best way to accomplish this is to lift a plug out, add nutrients and replace the plug.
  5. Seed germination will take from 7-14 days, sometimes longer.

Phase II – Seedling Growth

Phase II is the initial seedling growth

  1. Check the flat tray every few days and add water when needed to keep the tray full. The easiest way is to lift a plug out, check and add nutrients if needed, then replace the plug.
  2. After your seedling has produced three or four real leaves, start fertilizing with Bioblast 7-7-7 (Why I use Bioblast) every two weeks (Mix: 1 teaspoon per gallon, this is half strength), early in the morning or late in the afternoon. Do not spray during the heat of the day.
  3. Check the water level in the trays often and add water as needed to keep the flat tray full of water.
  4. Check and add nutrients as needed, the same mix as above or similar.
  5. Every two weeks foliar feed with Bioblast 7-7-7 fertilize (1 teaspoon per gallon, half strength), early in the morning or late in the afternoon. Do not spray during the heat of the day.
  6. When you see substantial growth and lots of roots, it is time to transplant into soil.
  7. Initial seedling growth is usually 2-3 months before it has enough root to transplant into 1 gal or larger pots.

NOTE: Your seedlings growth will vary depending on the weather and time of year. Spring is the best time for planting and growing plumeria seeds. Seeds need warmth and moisture to germinate; seedlings need warmth, moisture, and light to grow.

 Phase III – Transplanting to Soil and Fertilizing

When you have sufficient roots, it’s time to transplant the plugs into 1 gal or larger pots. I prefer to use Pro-Mix BX with Mycorrhizae (Why I use Pro-Mix BX) for the first transplanting of seedlings in soil. Usually good for eight months before time to move to larger pots.

  1. Fill a one gal pot or larger with Pro-Mix BX with Mycorrhizae.
  2. Drench the Pro-Mix with the same mix as above, (1 oz of Root Activator and 1 oz Vitazyme per gal of water)
  3. Make a hole large enough for the plug to fit in, (we use a rooting tube to make an indention into the soil).
  4. Insert the plug in the soil (Be careful not to damage the roots).
  5. Sprinkle two tablespoons of Excalibur VI (Why I use Excalibur Plumeria Fertilizer) around the plug and the top of the soil. Excalibur should last until the seedlings are approximately eight months old. I like to use the six months because the seedling should need to be transplanted every 6 months or so.
  6. Add soil to cover the fertilizer and the plug with about 1/2″ to 1″ of soil.
  7. Tamp the soil around the plug to assure good contact between the plug and the soil.
  8. Water the first time after transplanting, until the soil is soaked with the Nutrient mix (1 oz of Root Activator and 1 oz Vitazyme per gal of water).
  9. Add soil when needed.
  10. Be sure to monitor soil moisture and water well when the soil is almost dry. (A moisture meter is a good tool to use)
  11. Every two weeks Foliage feed with Bioblast 7-7-7 fertilize (1 tablespoon per gallon, full strength), early in the morning or late in the afternoon. Do not spray during the heat of the day.
  12. Treat for insects as needed.

Now that you have labored so hard to give your seeds the best possible care to help your seeds germinate and grow all you have to do is wait. I can assure you the feeling you get when you a plumeria seedling bloom that you grew from seed is worth it. Hopefully, you will find out how it feels for yourself in a few years.

Plumeria Seed Starter Kit

Plumeria Seed Selection

Plumeria seeds are fun to grow and can provide you with many years of pleasure. Before you begin you should consider seed choices and the limitations of your growing environment and conditions. Something to remember, Plumeria Rubra seeds do not grow true to their parents and they will take up lots of space and attention until they bloom. The average time to bloom is from two the three years, some shorter and some can take much longer.

Plumeria seeds in open seed pod.

Choosing the Right Plumeria Seeds

Before exploring how to best grow your plumeria seeds and seedlings, start with the right seed. If you intend to grow for grafting rootstock or you want to grow a new cultivar, you should use the best quality plumeria seeds possible.


Planting seeds to grow a new cultivar

Growing seedlings in the hope of getting new spectacular seedlings the most exciting journeys you can have with plumeria. Caring and babying of your seedlings for year after year waiting until it is old enough to bloom is a true labor of love. The anticipation when you see the first inflorescence starting to form is off the charts! If the flower turns out to be just like so many others, it is such a letdown, but you are ready to move on and plant more. But, in that rare case, your plumeria flower turns out to be a world-class spectacular flower, then it’s all worth it and you are ready to plant more. Did I mention that growing plumeria seedling IS very addictive?

Over the past 20 years, I have grown seedlings hoping to get that spectacular plumeria with some success. After joining Florida Colors in 2012 I have been fortunate to be able to dramatically increase my love for growing seedlings by growing several thousand each year for future plumeria.

What I’ve learned about seed selection while growing seedling for new cultivars:

  • Choose potential seed parents that have the characteristics you are hoping for in your seedling. 
  • Obtain seeds from trusted growers.
  • Get to know as much as possible about the pod and pollen parents as possible.
  • Find out as much as possible about what plumeria was growing next to the pod parent.
  • Do your best to research and find out if the parents have produced any good seedlings.
  • Always find out how old the seeds are. The older the seed the less of a germination rate. The germination rate depending on how old they are, how they were stored, the health of the pod tree, when and how they were harvested, and of course the cultivar.
  • Select seeds that look healthy and are not paper thin.
  • I have noticed over the last 4 years that the dark seeds seem to produce the darker seedlings.
  • Note: Seedlings with dark leaves and/or darker trunks have a better chance of producing flowers with color.
  • Note: Even the darkest seedling may produce a white flower.

Planting seeds for grafting rootstock

Growing seedlings grafting: Grafting a known plumeria cultivar onto a seedling with a superior root system is about the only way you can improve an existing plumeria cultivar. The rootstock will not cause any effects on the characteristics of the plumeria. All the characteristics above the ground, flowers, fragrance, growth habit and other characteristics will remain the same. Grafting a plumeria known to typically have weak root systems on a strong seedling root system will allow the plumeria to benefit greatly. The stronger the root system allows more nutrients to be absorbed, giving it a better chance to fight off disease and a better chance of survival. Typically seeds grown for rootstock will be allowed to grow for 1 to 3 years before being used for grafting.

Over the past 40 years, Florida Colors Nursery has grown over a hundred thousand seedlings for grafting purposes.

What we have found about selecting seeds for rootstock:

  • Seeds from pod parents with strong vigorous root systems, typically produce seedlings with a good root system.
  • Seeds from pod parents with light-colored flowers, typically produce good rootstock.
  • Seedling with light-colored stalks, leaves, typically have good root systems and are good for rootstock.
  • Dark-colored seeds will produce darker colored stalk and leaves and are typically not good for rootstock.
  • Seedlings with dark stalks and/or leaves, typically have the greatest graft failure rate.
  • Seedlings that are small and slow-growing typically are not good for grafting.
  • Of course, multi-branched and seedlings that branch a lot are typically not good for grafting.
  • And young green seedlings are typically not good for grafting.

Notice I use typically on every line because there are always exceptions to the rule when it comes to Plumeria.

2-2-2018 – Planting Seeds Project Update

2-2-2018 Update, Starting with the Basic Project Details.

Plumeria Seed Pod ready for plantingPlanting seed weather in Homestead looks good enough to start my seed planting and seedling projects. The forecast says the lows are going to be around 60 and the highs around 80 for the next two weeks. This is the earliest I’ve planted plumeria seeds outdoors. They will be in full sun open to the weather. It will be interesting to see how they do. I expect them to take longer than my normal to germinate. I will be planting some more around March 1, to see if there are differences. 

Here is the updated list of seeds I’m planning on planting. The ones in bold, I waiting on fresh pods to open. I always try to plant all the seeds in a pod, if possible.

Gina, Hope, Jackie, Metallica, Super Round (J115), Jack’s Purple, Dwarf Singapore Pink, Mardi Gras, Aztec Gold, Waimea, Bonnie Fox, Raspberry Sundae, Salmon Jack….so far!

Materials Needed:
Plumeria Seeds, something to soak the seeds in, 2” x 3” Gro-Tech FlexiPlugs and trays, Vitazyme, Carl Pool’s Root Activator, Bioblast 7-7-7, Pro-Mix BX Mycorrhizae, Excalibur VI 11-11-13, Metal Labels or plastic plant markers and permanent felt tip marker.

OK, the bench cleared off, containers and trays cleaned, plugs on to soak and organized the materials and products I use to germinate the seedlings. The plant is to start soaking seeds on Saturday.

I’ve decided to try several methods to see if they make any difference and to give you an idea which will work for you.

Basic Planned Regimen for 2018 Seed Projects –  substituting Pro-Mix BX Mycorrhizae mix for FlexiPlugs

The trays I use have 36 compartments, so most of the trays will have 36 seeds in each with 2″ x 3″ compartments. I will be comparing germination and growth differences between the FlexiPlugs and using ProMix soil.

Phase I – Soaking the Seeds before Planting

Plumeria seeds need moisture and warmth to germinate. They do not require light to germinate.

  1. First Dip seeds in a mix of Vitazyme and warm (not hot) water and allow to dry before proceeding.
  2. Soak seeds in warm water until plump, about 2-4 hours, overnight is ok. A good rule of thumb: Seeds that sink after absorbing water are usually viable. Seeds that float are normally not viable. Soaking seeds gives them a head start and a good way to checks viability.
  3. I sometimes use the paper towel method for germination.
    1. Place the seeds between two paper towels, wet the towels, put in a warm place, keep the towels moist and do not let them dry out. When you see roots it is time to plant the seed. 
      Caution: It’s important you do not continue to soak after roots start showing. They should be put in soil or plugs at that point. Waiting will only increase the chances of damaging the roots. Do not allow the seeds to dry out. 

Phase II – Soaking and Preparing the Plugs and ProMix.

  • Soaking Plugs: Materials: 2″ x 3″ FlexiPlugs, 36 holes Plug Tray for 2″ x 3″ Plugs, Two flat trays to hold the FlexiPlug trays. (one with drainage and one without), Vitazyme and Root Activator.
    • Soak plugs in Vitazyme (1 oz. per Gal) and Root Activator (2 oz. per gal) Soak for 1 to 2 hours.
    • Place the plugs in the trays, then plant the seeds in the FlexiPlugs with the flags and deep enough to cover the body of the seed with the flag sticking up and above the soil and water well.
    • Place ProMix soil in the trays and gently tamp until firm, plant the seeds in the ProMix with the flags and deep enough to cover the body of the seed with the flag sticking up and above the soil.
    • Water well with leftover Vitazyme and Root Activator mix. 
  • Drenching the Soil: Materials: ProMix, Same 36 holes Plug Tray used for 2″ x 3″ Plugs, Vitazyme and Root Activator.
    Because the 2″ x 3″ plugs aren’t readily available, I’ve decided to test using the ProMix in the Plug Tray instead of the plugs.
     

    • Fill the plug tray with ProMix soil and gently tamp until firm
    • Fill a Plug Tray flat without out holes about 2/3 full with Vitazyme (1 oz. per Gal) and Root Activator (2 oz. per gal) 
    • Place the Plug Tray filled with ProMix into the tray without drain holes. Allow to Soak for 1 hour or so.
    • Lift the Plug tray and allow to drain some, then place the tray with the plugs in a tray flat that has holds.
    • Plant the seeds in the ProMix soil deep enough to cover the body of the seed with the flag sticking out above the soil.
    • Water well with leftover Vitazyme and Root Activator mix. 
  • Using 10″ x 16″ x 3″ Flat Trays: Materials: Seeds, Seedling soil mix, Plug Tray, Vitazyme and Root Activator.
    • Fill a flat tray with good drain holes or slots about 2/3 full of good seedling soil.
    • Water well with Vitazyme (1 oz. per Gal) and Root Activator (2 oz. per gal) 

Phase III – Planting the Seeds

  • Labeling Trays: Before you start planting your seeds be sure to prepare labels and be sure to label every group of seeds with a minimum of the date and cultivar. Create a label for each individual seedling you are planting. 
  • Growing plumeria from seeds for new cultivars and/or rootstock.
    • Growing Seeds For New Cultivars: Materials: Seeds, 2″ x 3″ FlexiPlugs, Plug Tray, Vitazyme and Root Activator.
    • Plant the seeds in ProMix soil deep enough to cover the body of the seed with the flag sticking out above the soil.
    • Water well with leftover Vitazyme and Root Activator mix. 
  • Growing Seeds for Rootstock: Materials: Seeds, Seedling soil mix, Plug Tray, Vitazyme and Root Activator. 
    • Using the flat tray from above, place the seeds horizontal (flat) on the soil and cover with an additional 1/2″ or so of soil.
    • Water well with a Vitazyme and Root Activator mix.

Place in a sunny location, If your nighttime average 60 degrees or above at night you are safe to put the seeds outside. Seeds will germinate and grow best in Springtime and early Summer. Warmer weather helps germination, but the soil over 95 degrees could slow down germination. `The hotter the weather to more often they will need watering.  I think full sun is the reason I’ve had almost no problems with damping off or seedling rot. Caution: In hot regions, you may need some shade

Watering your seeds

  • Keep plugs very moist. 2-3 times a day. The FlexiPlugs are foam injected peat plugs, that have proven to provide great air circulation even when wet and the plumeria seeds grow great. Although decomposition takes much longer than normal plugs, I feel it is worth the trade-off. 
  • For the ProMix in plug trays and the flats, water twice a day to keep the soil moist. Do not allow the soil to dry out.

Seed Germination – your seeds will germinate in 5-15 days, depending on the cultivar, the method used and the growing conditions.

Phase IV – Young Seedlings

After Germination, the seeds will put out roots, the seed leaves (Cotyledon) will break the surface and the seed coat will fall off and true leaves with start growing.

The seed leaves (Cotyledon) contain nutrients to help keep seedling alive until the roots can grow enough to start providing nutrients and until the real leaves have grown to perform photosynthesis to process the nutrients. 

After 3 or 4 real leaves have grown, foliar feed with Bioblast (1 tablespoon per gal). Remember when the seed leaves go away the seedling will need a source of nutrients. Caution: Apply only Early or Late in the day, not in strong sunlight, it may burn the leaves.

Phase V – Transplanting

Materials: ProMix or Seedling soil mix, 2 gal pots, 7 1/2 gal squat pots. Vitazyme and Root Activator, Excalibur and a Moisture Meter

Create a label for each seedling and be careful to label correctly with a minimum or the date planted and cultivar. We put the letter “S” on the tag to clearly indicate it is a seedling.

When you see several roots coming out the bottom and/or sides of the plug or tray it’s time to transplant. 

When transplanting I fertilize with Excalibur IX 11-11-13 (3 tablespoons for 2  pot and 5 tablespoons for the 7 1/2 gal pots) Mix in top 1” of soil to cover fertilizer granules. I suggest 9 months because you can apply again in 9 months providing nutrients all year long. Caution: If you can’t keep the seedling growing all year long, or depending on your growing season, it may be better to use Excalibur IV and apply twice a year.

Be sure the Plugs are completely covered by soil, this will help them to decompose and prevent premature drying out.

This year, I plan on transplanting the 2″ x 3″ plugs to 2 gals and 7 1/2 gal squat pots. I’m expecting the 7 1/2 gal pots may help the growth rate.

Soil mixtures:

  • I’m using Pro-Mix BX Mycorrhizae for the soil mix for growing seedlings for new cultivars.
  • A good seedling mix is good for growing rootstock.

Water well after transplanting with a mix of Vitazyme and Root Activator.

Phase VI – Extended Fertilizing and Care

Materials: Excalibur VI or IX, BioBlast and a Moisture Meter

Foliar feed every two weeks with a mix of BioBlast (1 tablespoon to 1 gal of water) and Vitazyme (2 tablespoons to 1 gal of water), early or late in the evening.

If possible keep seedlings growing for the first year by keeping in a warm, sunny location. Additional Lighting may be needed.

Water as needed, allow the pot to almost dry out and water well making sure all the soil is evenly watered. Do not allow to bet completely dry. A moisture meter is always a good tool to have.

1-27-2018 Updates – Seed & Seedling Projects

January 27th, 2018

Seed selection and planting, it’s time to start working on the details. My planned start date, Feb 1st is just around the corner.

Here is the list of seeds, Gina, Hope, Heirloom, Jackie, Metallica, Super Round (J115), Jack’s Purple, Dwarf Singapore Pink, Mardi Gras, Aztec Gold, Waimea, Bonnie Fox, Raspberry Sundae….so far!

Products Needed:
Plumeria Seeds, something to soak the seeds in, 2” x 3” Gro-Tech FlexiPlugs and trays, Vitazyme, Carl Pool’s Root Activator, Bioblast 7-7-7, Pro-Mix BX Mycorrhizae, Excalibur VI 11-11-13, Metal Labels or plastic plant markers and permanent felt tip marker. Hydrogen Peroxide and Merlin’s Potion for new experiments. 

2018 Seed & Seedling Projects

Basic Planned Regimen for 2018 Seed Projects

  1. Dip seeds in a mix of Vitazyme and warm (not hot) water. Caution: Allow to dry before proceeding.
  2. Soak seeds in warm water until plump. A good rule of thumb: Seeds that sink after absorbing water are usually viable. Seeds that float are normally not viable. Gives them a head start and a good way to checks viability. Caution: It’s important you do not continue to soak after you see the roots starting. They should be put in soil or plugs at that point. Waiting will only increase the chances of damaging the roots.
  3. Soak plugs in Vitazyme (1 oz. per Gal) and Root Activator (2 oz. per gal) Soak for 1 to 2 hours. (New Experiment: soak in 1 oz of hydrogen peroxide per 1 gal.) 
  4. Place seeds in plugs with the flags and deep enough to cover the body of the seed with the flag sticking up and above the soil and water well. Plumeria seeds will also germinate by placing them on the side and covering with 1/2″ of so of soil.
  5. Place in sunny location, I think full sun is the reason I’ve had almost no problems with damping off or seedling rot. Caution: In hot regions you may need some shade
  6. Water often to keep plugs very moist. 2-3 times a day. The FlexiPlugs are foam injected peat plugs, that have proven to provide great air circulation even when wet and the plumeria seeds grow great. Although decomposition takes much longer than normal plugs, I feel it is worth the trade off. Caution: In areas where you sun will burn leaves, you may have to only water well in morning and evening.
  7. Start Foliar feeding with Bioblast (1 tablespoon per gal) as soon as they all have an average of 3-4 leaves. Remember when the seed leaves go away the seedling will need nutrients from the soil or fertilizer. Caution: Apply only Early or Late in the day, not in strong sunlight, it may burn the leaves.
  8. When you see several roots coming out the bottom and or sides of the plug transplant to 1 gal pot. Caution: Be sure the Plugs are complete covered by soil, this will help the decomposing and prevent premature drying out. (New Experiment: I plan on transplanting the 2″x3″ plugs to a 7.5 gal squat pots)
  9. I suggest using Pro-Mix BX Mycorrhizae for your soil mix.
  10. Fertilize with Excalibur IX 11-11-13 (1 tablespoon per gal pot) Mix in top 1” of soil to cover fertilizer granules and water well. I suggest 9 month because you can apply again in 9 months providing nutrients all year long. Caution: If you can’t keep the seedling growing all year long, It may be better to use Excalibur IX at the beginning of the growing season.
  11. If possible keep seedlings growing for the first year by keeping in a warm, sunny location. Additional Lighting may be needed.
  12. Water as needed, allow pot to almost dry out and water well making sure all the soil is evenly watered. A moisture meter is always a good tool to have.

2018 Planned Experiment 1 – (Hydrogen Peroxide)

  1. Dip seeds in a mix of Vitazyme, Hydrogen Peroxide and warm (not hot) water. Caution: Allow to dry before proceeding. Optional will dip some and not dip some.
  2. Soak seeds in warm water and Hydrogen Peroxide until plump. (1 oz of hydrogen peroxide to 1 gal, final mix to be determined) A good rule of thumb: Seeds that sink after absorbing water are usually viable. Seeds that float are normally not viable. Gives them a head start and a good way to checks viability.
  3. Soak plugs in Vitazyme (1 oz. per Gal), Root Activator (2 oz. per gal) and Hydrogen Peroxide (1 oz to 1 gal) Soak for 1 to 2 hours. 
  4. Place seeds in plugs with the flags and deep enough to cover the body of the seed with the flag sticking up and above the soil and water well.
  5. Place in sunny location, I think full sun is the reason I’ve had almost no problems with damping off or seedling rot. 
  6. Water often to keep plugs very moist. 2-3 times a day work for me.
  7. Start foliar feeding with Bioblast (1 tablespoon per gal) as soon as they all have an average of 3-4 leaves. Remember when the seed leaves go away the seedling will need nutrients from the soil or fertilizer. 
  8. When you see several roots coming out the bottom and or sides of the plug transplanting the 2″x3″ plugs directly into 7.5 gal squat pots and 3 gal pot.
  9. Soil is Pro-Mix BX Mycorrhizae or a mix with Florida Colors soil and Pro-Mix Mycorrhizae. Details of the mix coming at time of transplanting.
  10. When transplanting, fertilize with Excalibur VI 11-11-13 (1 teaspoon per gal pot) Mix in top few inches of soil, it is best to completely cover fertilizer granules and water well. I use 6 month I keep seedling growing year around and I apply again in 6 months providing nutrients all year long.
  11. If possible keep seedlings growing for the first year by keeping in a warm and in a sunny location. Additional Lighting may be needed.
  12. Water as needed, allow pot to almost dry out and water well making sure all the soil is evenly watered. A moisture meter is always a good tool to have.

2018 Planned Experiment 2 – (Merlin’s Magic Potion – MMP)

  1. Dip seeds in mix of Merlin’s Magic Potion and warm water and allow to dry before proceeding.
  2. Soak seeds in warm water and Hydrogen Peroxide until plump. (1 oz of hydrogen peroxide to 1 gal)
  3. Soak plugs in Merlin’s Magic Potion (2 oz per gal) Soak for 1 to 2 hours. 
  4. Place seeds in plugs with the flags and deep enough to cover the body of the seed with the flag sticking up and above the soil and water well.
  5. Place in sunny location, I think full sun is the reason I’ve had almost no problems with damping off or seedling rot. 
  6. Water often to keep plugs very moist. 2-3 times a day has worked for me.
  7. Start foliar feeding with Bioblast (1 tablespoon per gal) as soon as they all have an average of 3-4 leaves. Remember when the seed leaves go away the seedling will need nutrients from the soil or fertilizer. Foliar feed every two weeks (1 oz to 1 gal of water) 
  8. After two weeks or so, but before transplanting into pots, soak plugs with seeds in a mix of Merlin’s Magic Potion and water. (1 oz to 1 gal of water)
  9. When you see several roots coming out the bottom and or sides of the plug transplanting some of the 2″x3″ plugs directly into 7.5 gal squat pots and some in 2-3 gal pot.
  10. Before transplanting into pots, soak plugs with seeds in a mix of Merlin’s Magic Potion and water. (1 oz to 1 gal of water)
  11. Soil is Pro-Mix BX Mycorrhizae or a mix with Florida Colors soil and Pro-Mix Mycorrhizae. Details of the mix coming at time of transplanting.
  12. When transplanting, fertilize with Excalibur VI 11-11-13 (1 teaspoon per gal pot) Mix in top few inches of soil, it is best to completely cover fertilizer granules and water well. I use 6 month I keep seedling growing year around and I apply again in 6 months providing nutrients all year long.
  13. If possible keep seedlings growing for the first year by keeping in a warm and in a sunny location. Additional Lighting may be needed.
  14. Water as needed, allow pot to almost dry out and water well making sure all the soil is evenly watered. A moisture meter is always a good tool to have.
  15. Drench with Merlin’s Magic Potion (2 oz to 1 gal of water)
  16. Continue foliar spraying with Bioblast every two weeks (1 oz to 1 gal of water) 

Depending on the weather, I planning on starting this project on Feb 1, 2018. Come back then.

1-27-2018 Updates – Seed & Seedling Projects

Optimizing Seed to Seedling Growth

My 2018 projects are designed to determine how to speed up the growth of seeds and seedlings to the point of maturity without causing them to grow excessively tall and lanky. The goal is to grow seedlings to maturity and produce blooms as soon as possible. It is important to understand all about the Plumeria seeds and seedlings growing habits and of course the limitations. Using different products, strength and methods can produce different results at different stages during the growing period and in different growing environment and conditions. I’ve experimented with many growing methods and products to determine what works best for me. A short cut would be finding someone in your area and start with what they have had success with and see if it’ll work for you. 

Plumeria are Dicots (Two-seed Leaves)

The primary root, called the radicle, is the first thing to emerge from the seed. The primary root anchors the plant to the ground and allows it to start absorbing water. After the root absorbs water, the shoot emerges from the seed. In dicots, the shoot has three main parts: the cotyledons (seed leaves), the section of the shoot below the cotyledons (hypocotyl), and the section of shoot above the cotyledons (epicotyl). The way the shoot emerges from soil or growing media follows two main patterns. In plumeria, the section of the shoot below the cotyledons elongates and forms a hook, pulling the cotyledons and the growing tip through the soil. Once it reaches the surface, it straightens and pulls the cotyledons and shoot tip of the growing seedlings into the air. This is called epigeous germination. 

After the shoot emerges, the seedling grows slowly while the storage tissue of the seed diminishes. Soon, the plant develops a branched root system or taproot. Then, true leaves that look like the leaves of the mature plumeria appear. These leaves, unlike cotyledons, photosynthesize light into energy, allowing the plant to grow and develop. When the true leaves start converting light into energy, the seedling needs a source of nutrients.

How Plumeria Seeds Form and Germinate – Before You Start Growing Plumeria From Seed

 About Plumeria Seed Selection

Optimizing Seed Germination

We know that plumeria seeds need optimal amounts of water, warm temperatures to germinate. If we don’t create the most optimal environment possible, then plants tend to germinate slowly and unevenly. Generally, space is limited, so we want plants to germinate as quickly as possible. Uneven germination can also cause problems. If you have ever had to transplant a flat of seedlings where half are ready to plant and the other half are too small with root balls that don’t slide easily out of their cells, you will understand why. Damage to roots can cause a setback in the growth of the seedling.

One common option to achieve optimal germination temperature in growing media is to use germination mats. These mats allow you to set the temperature according to seed requirements. For Plumeria I’ve found 85 degrees or above seems to be good. Plumeria will germinate in 7 days at 85°F but may take more than 15 days to germinate at 65°F.

Make sure you maintain optimal temperatures for your plumeria seeds. It is also critical to promote air circulation to mitigate fungal pathogens such as those causing damping off. I’ve been growing outside in the sun with very little dampening off problems. 

Starting Seedlings in Plugs 

Additional information about seeds and seedlings is available on Plumeria Care

Optimizing Seed to Seedling Growth

Typical seedling growth after 12 day in Plugs

Typical seedling growth in tray after 12 days

The optimal temperature for growing seedlings may be different from seeds. Remember, the optimal temperature will stimulate optimal growth. Cooler temperatures generally slow down growth, and warmer ones speed up growth to a point. 

Temperature and time required for growing Plumeria seedlings to transplanting size using FlexiPlugs. Day (F) 75-90, Night (F) 60 or above, Time 15-20 days. I plan on transplanting to pots when I see plenty of roots and three or four real leaves. The photos show seedling at 12 days, the roots are there, but they need a few more leaves.

Over the last four years, I’ve been experimenting with different media for seeds and seedlings. I’ve determined the 2″ x 3″ FlexiPlugs are the best choice for my growing conditions. They give me the ability to water 3 or more times a day and the plugs still provide adequate oxygen to the roots. I soak the FlexiPlugs in Vitazyme and Carl Pool’s Root Activator and the plug does a good job of holding the nutrients. The plugs also provide the best way I’ve found to allow transplanting with minimum root damage. The only issue I found is the slow decomposition rate of the plugs, but I haven’t noticed any negative effects on the growth of the seedlings.

As the seeds germinate and the seedlings grow, it is important to keep the plugs moist by watering less often but longer to accommodate developing root systems. I check my seedling several times a day by pressing the top of the plugs with my finger to check for moisture. If they don’t feel moist or if they look a little dry, I will water. Remember to carefully monitor and water the plants at the edges of trays. They dry out faster than those in the middle. Something else I like about the FlexiPlugs, I actually watered the Plugs every hour or so during the day for 4 days, the seedlings did fine.  But you should remember using some other methods, overwatering can increase the probability of plumeria developing damping off or stem rot.

Why Use FlexiPlugs

Fertilizing Young Plumeria Seedling – About Growing Plumeria Seedlings

Additional information about seeds and seedlings is available on Plumeria Care

Optimizing Seed to Seedling Growth

About Growing Plumeria Seedlings

Growing plumeria from seeds can be a rewarding and exciting way to add new cultivars to your collection. But in order to grow plumeria from seed you must know something about caring for plumeria seedlings. 

If you germinate you seed between wet paper towels or use other methods of germination other than planting straight in plugs or soil, you should plant the seedling as soon as you see a root. Leaving them too long or allowing them to dry out could damage or even kill the new seedling. 

A seed turns into a seedling as soon as it germinates. When you plant a seed, the first leaves to emerge are the cotyledons. These leaves will look different from leaves that will grow later. The purpose of these leaves is to provide stored food to the seedling for a short period of time. True leaves grow shortly after the cotyledons. When your seedling has three of four true leaves it need light to start generating energy through photosynthesis that will help feed the plant for the rest of its life.

Common Questions

  • How much water should my seedling get?
    Watering is very important, you should keep the soil moist but not wet. In the sun small pots will dry out very quick. As you transplant into larger pots the soil will be able to hold more water and watering is needed less often.
      
  • When do I transplant my seedlings?  
    Transplanting seedlings at the proper time is crucial to their development later on. If you transplant them before they are ready, they may have a hard time surviving. If you wait too long, your seedlings growth may be slowed down or become pot bound in its original container. When it comes to how to transplant seedlings, there is no hard and fast rule to how tall a seedling should be before you transplant or put outside in the garden, due to the fact that different plumeria grow to different sizes. A general rule is when a seedling has three or more true leaves and you see roots coming out of the bottom of the pot, it’s large enough to transplant or place out in the garden (after it has been hardened off).Making sure that the plant has enough of these leaves to keep it sustained when planted out in your garden is important to its proper growth. Just remember, it isn’t how tall but how many true leaves your plant has that will determine when you should be planting seedlings out. But even when your seeds are big enough to plant out, make sure you harden off your seedlings before planting them. 
     
  • When and how to fertilize seedlings?
    When the seedling has true leaves and roots it is capable of absorbing nutrients from the soil or from fertilizer. When cotyledons are gone, the seedling needs other sources of nutrients. We recommend adding a balanced slow release fertilizer, such as Excalibur to the soil or spray with a foliar fertilizer such as Bioblast at half strength. More info on Nutrients and Fertilizer
      
  • What size pots are best for my seedlings?
    Start with a small sized pot and transplant into larger pots as your root system develops. Transplanting or starting with a 4″ pot will allow plenty of room for the roots and provide the pot to almost dry out between watering. When you see roots coming out of the pot it is time to transplant to a 1 gal pot. Do not allow the roots to become root bound in the pot. If you slip a couple of pot sizes and go to a much larger pot, the soil will have harder time dissipating the moisture and heat has less chance of helping the roots grow.
       
  • Can I plant my seedling in the ground?
    Spring is the best time to plant in the ground, after the last frost and best when the night time lows are above 60s. Planting in the ground is a good idea as soon as they have established a good root system.  I would allow to grow to minimum of 18″ before putting them in the ground. At that point you can treat your seedling as you would mature plumerias. They still need a supply of nutrients, good sun, good soil with good drainage. Some use raised beds to allow the benefits of the in ground space for the roots to grow. Just remember to protect from cold and to provide plenty of room to grow. 
       
  • What soil is best for my seedlings?
    When preparing to transplant you need to get quality soil for seedlings. The soil is the key to success with any plumeria and should give your seedling the optimum growth. Any good soil suggested for seedling is ok, but the best soil I have found is ProMix BX with Mycorrhizae. The soil must be well draining no matter what soil you use.  

About Plumeria Seeds and Seedlings

Plumeria Seeds is a comprehensive guide that provides valuable information on growing plumeria seeds from germination to blooming. There are three main reasons for growing plumeria seeds.

1) For rootstock to use for grafting
2) to produce new cultivars
3) just for the fun of it

“I have been growing plumeria from seeds for 15 years in Texas and the past 10x years in Florida. It is a very enjoyable and relaxing experience for me. The excitement, anticipation, and feeling of accomplishment are some rewards, but the best reward is the feeling I get when a seedling blooms for the first time, especially when it is an exceptional flower. I encourage everyone to give it a try.”

This website shares my experiences and preferred methods to help others grow plumeria from seed to bloom while providing a logical understanding of the method.

I will share information about pollination, seedpods, germination, and the initial transplanting process on this website.

Various effective methods are used globally for growing plumeria from seed, which can be adapted to suit the grower’s environment and growing conditions. It is important to take into account your specific environment and growing conditions. Not covering specific growing methods doesn’t necessarily mean they are bad. What specific methods for growing plumeria seeds are recommended by the author?

How long does it typically take for a plumeria seedling to bloom? 

If you plan to grow plumeria from seeds, selecting ones that match your ultimate goals is crucial. You may also want to try out some new varieties, but don’t keep changing year after year. If available, it’s essential to gather information about the seeds’ lineage, including their parents and grandparents.

I have been keeping detailed records of the ongoing 2018 projects in Plumeria Seeds and detailed photos. Since 2014, I have learned to keep more detailed records every year. As time permits, I will also provide information about previous years. Depending on the required rootstock, I usually plant between 2 and 5 thousand seeds yearly. Around 1000 of these seeds are planted to grow new cultivars and for experimentation. It takes a lot of care and space to grow a seedling. You may have to keep seedlings for several years before deciding if they are worth keeping. Therefore, it’s essential to consider how many seedlings you can take care of over the years.

The projects in 2018 include seed selection, viability testing, seed preparation, planting, fertilizing, transplanting, watering, and soil management, among other things, until the plants bloom. One project focuses on parent selection for 2019 seed projects.

“I enjoy trying out various products and methods to find what works best for me in South Florida’s Zone 10b. My successes and failures have given me valuable insights, and I hope to share this useful information with you through this site. Learn from my experiences, both good and bad, and discover what works for you.”

Note: Each plumeria is a seedling of its parents and referred to as such until it blooms on Plumeria Seeds.

To give you an idea of what my plans are, check out…A guide to help grow plumeria seeds and visit Florida Colors Nursery for products I use to grow my seedlings.

For more detailed information on caring for all plumeria, visit the Ultimate Plumeria Care Guide.

About Plumeria Seeds and Seedlings

A Guide for Growing Plumeria From Seed

This guide shares the basic methods I use for growing plumeria from seed, caring for seedlings, and the products I use. I hope this guide helps you with your seed goals for the year.

There are many proven methods to growing plumeria from seed and you should examine to see if any could help you develop a method that works for you. This is only a guide and should be adjusted to your seed growing environment.

When I have a batch of seeds, I examine what I did in the past and determine if I can make any improvement. The following is my detailed plan for growing plumeria from seed in 2018. This plan covers from germination until they first produce blooms.

Please keep in mind your growing environment and the differences from South Florida Zone 10B. The start of your plan should correspond to when you are past the threat of a frost or freeze. You should also make plans to protect your plumeria from cold weather, just in case you have a late freeze or frost. 

My goal is to know what, when, and why, so I can improve my method every year or even with each batch. Documenting all adjustments as you go will allow you to look back and better determine where you can make improvements.

Why I grow seedlings?
          1. To grow a new and exciting cultivars
          2. To grow rootstock for grafting
          3. But most of all to see that one-of-a-kind flower for the first time.

Using the methods and products below; I have been able to get about 10% of my seedlings to bloom in less than 12 months and about 60% to bloom in 18 to 24 months. The majority of the remainder bloom from 24 to 36 months. (Some do still take 3 years and even longer.)

What you will need: Plumeria Seeds, something to soak them in, paper towels, 2” x 3” Gro-Tech FlexiPlugs and trays or plugs or good seedling soil mix to plant the seeds in, Vitazyme, Carl Pool’s Root Activator, Bioblast 7-7-7, Pro-Mix BX Mycorrhizae, Excalibur VI 11-11-13, Labels and permanent felt tip marker. Hydrogen Peroxide is good to use for mold or fungus.

Seed selection

Seed selection is very important when growing plumeria seeds. Plumeria Rubra seeds do not produce true to their parents. Sometimes a seedling will look like its parent, but it will never be exactly the same.  A few characteristics to consider:

  • Flower: Color, size, keeping quality (how long it lasts after picking), fragrance, etc.
  • Tree: Growing habit, size, etc.
  • Leaves: Color, size, etc.
  • Blooming: Quality, size of inflorescence/flower stalk, number of flowers blooming at the same time, how long does it bloom, etc.

I’m always trying to improve my chances of getting that spectacular plumeria seedling.

If possible:

  • Select a pod parent that is known to produce the characteristics you desire or at least a pod parent that has the characteristics you desire.
  • Obtain seeds from trusted growers.
  • Find out the history of the pod, e.g., What’s growing close to the pod? Did they bloom at the same time? Was it cross-pollinated, manually pollinated, or pollinated by nature?
  • Obtain all the seeds from a pod when possible.
  • Select seeds from a healthy tree.
  • Select seeds that are plump and look healthy.

Before you plant your seeds

Soak plumeria seeds to test the viability and soften the shell to give them a kick start.

When: Plumeria seeds germinate best in the spring, but can be germinated any time if provided with enough moisture and warmth staying above 60 degrees.

What: Use quality seeds, warm water, and Vitazyme

How: 

  1. First, examine each seed by placing it between two fingers. If they have some thickness, they most likely are viable. If they feel paper-thin, they most likely are not viable.
  2. For faster germination and rooting, dilute Vitazyme with warm water at a rate of 1 oz to 19 oz of water, a 5% solution, and dip or mist both sides of the seed. Allow seeds to dry prior to planting or soaking.
  3. For a soaking mixture, dilute Vitazyme with warm water at a rate of about 1.29% or 1 oz to 128 oz (1 gallon).
  4. Place your seeds in the container, place in a warm area, and allow to soak for approximately 4-6 hours (or even overnight). Soaking longer than overnight could cause damage to the seeds. Seeds that are very thin and are still floating are most likely not viable. To further test this, plant all the seeds, but mark the ones that did not sink.
  5. Check your seeds after several hours to see which seeds are absorbing enough liquid to allow germination and to sink to the bottom.
  6. Do not allow your seeds to dry out before you plant them.
  7. Now your seeds are ready to plant.

Why: 

  1. To soften the seed’s protective coating
  2. To allow the seed to absorb as much water as possible
  3. To test the viability of the seed
  4. To provide nutrients as early as possible, helping germination and starting the rooting process sooner

Preparing Plugs

When: Prior to planting seeds in plugs.

What: 2”x3” Grow-Tech peat plugs, warm water, Root Activator, and Vitazyme.

What we suggest: A mixture of warm water, Vitazyme, and Carl Pool’s Root Activator.

How: Soak your plugs in a mixture of 1 gal of warm water, 2 oz Root Activator, and 1 oz Vitazyme for about 2 hours.

Why: Vitazyme is a bio stimulate with vitamins that help the overall health of the seeds and the Root Activator adheres to the plugs or soil and gives the roots a kick-start. I use the plugs because they hold the right amount of moisture and provide ample aeration that allows the new roots to breathe.

Watering: Keep your plugs wet or leave them soaking until you are ready to plant the seeds.

Planting your seeds

When: Plant your seeds right after soaking into the prepared plugs. DO NOT allow either to dry out. If they dry out they could be damaged.

Plugs, Pots or Trays, After Soaking, For the seeds, I grow for new cultivars, I prefer planting the seeds directly into 2″ x 3″ Grow-Tech FlexiPlugs, a foam peat plug. For the seeds, I’m growing for rootstock in flat trays or 4″ pots.

What: Carefully selected plumeria seeds, 2”x3” Grow-Tech FlexiPlugs. Warm water, Root activator, and Vitazyme. You will also need a 36-hole tray and a flat for the plugs. A cover is optional.

Why: The reason I use the plugs is they hold moisture allowing me to keep them soaked with water and still providing ample aeration and allowing the new roots to breathe. I use the 2” x 3” FlexiPlugs that allows me up to 14-21 days before I have to transplant to pots.

Watering – I grow Plumeria seeds in full sun and water 2-3 times a day depending on the weather. My goal is to keep the plugs very moist to the touch. I have had no damping off or rotting problems with this method.

Start Fertilizing – Foliage

When: Before transplanting the plugs into pots, after three or four true leaves have grown. I use the same mix ( see below) approximately every two weeks

What:  BioBlast 7-7-7 NPK fertilizer, Vitazyme

How: Foliar feeding early in the morning or late in the evening with Bioblast at 1 tablespoon per 1 gallon of water and Vitazyme at 1 tablespoon per gallon. Do not spray in the hot sun it will burn the seedling leaves.

Why: Seedlings have seed leaves that provide them with nutrients for the first few weeks of their life, but when the seed leaves dry up and fall off the seedling needs nutrients. Bioblast works with every part of your plant. Soil organisms are invigorated with Vitazyme bio-stimulants providing quicker, more vigorous growth. Roots are encouraged with our Root Activator. A balanced 7-7-7 NPK provides the essentials of plant growth and structure. B-Vitamins and Zinc encourage a robust immune system, while Iron promotes chlorophyll production in the leaves.

Watering – I continue to grow Plumeria the seedlings in full sun and water at least 2-3 times a day depending on the weather. My goal is to keep the plugs moist to the touch. I’ve had no damping off or rotting problems.

Transplanting to Pots and Fertilizing

When: As soon as I see roots sticking out of the plugsPlumeria seedling roots coming out of the Plugs grown from seed, transplant into larger pots. Normally I will use 1 gal pots, but this year I’m using 7.5 gal squat pots. Approximately 14 days after planting in the plugs.

What: ProMix BX Mycorrhizae, Excalibur VI 11-11-14 with micronutrients, Vitazyme, and Root activator.

How: Fill 1 gal. pot with a mixture of ProMix BX Mycorrhizae mixed with 2 tablespoons of Excalibur Vi. Fill a 7 1/2 gal. squat pot with ProMix BX Mycorrhizae or the mix of your choice, dig an area our in the mix about the size of a 1 gal pot, port the contents of the 1 gal pot in the hole, then punch a hole about the size of the FlexiPlug (about 2″x3″) in the center of the filled 7 1/2 gal pot. Place the plugin the hole and press the mix firmly around the plug. Water in well with a mix of Vitazyme 1 oz to 1 gal and Root Activator 2 oz to 1 gal. You may need to add more soil mix if the plug is not covered completely with at least ½” of the mix. Water again the next day and then when the soil is almost dry. I would suggest using a water meter from time to time to verify the moisture content. It is very important the soil does not stay wet.

Why: Promix BX contains Mycorrhizae and is a fast-draining mix. The Excalibur VI, a 6-month granular slow-release fertilizer designed specifically for plumeria that provides all the nutrients a seedling needs to grow strong. Vitazyme a bio-stimulate helps the overall health of the seedlings and the Root Activator adheres to the soil and is there to help the roots develop and grow faster.

Watering – Water once a day for the first two days, then water when the soil is barely moist. At this point, I check with a moisture meter and water when on the low side of moist. It is important not to overwater, keeping the excess soil mix from becoming water-soaked. It is also important not to allow the root zone to become dry.

Fertilizing – Throughout the growing season

When: Apply Excalibur VI every six months, Foliar feed every two weeks to every month with BioBlast.

What: Excalibur VI 11-11-13, BioBlast 7-7-7, Vitazyme and Carl Pool’s Root activator

How: After 6 months, I spread 3 or 4 tablespoons of Excalibur VI on the top of the soil and mix in the top 1-2” of the soil. The seedling should still be in the 7 1/2 gal squat pot. Foliar feed with BioBlast 1 oz to 1 gallon and Vitazyme 1 oz to 1 gal every month or less. Drench with Vitazyme and Root Activator in the Early Spring or if transplanting.

Why: Excalibur provides a balanced slow-release fertilizer specifically designed for plumeria.  BioBlast works with every part of your plant. Soil organisms are invigorated with Vitazyme bio-stimulants providing quicker, more vigorous growth. Roots are encouraged with our Root Activator

If possible, do not let seedlings go dormant their first winter. You can treat seedlings as adult plumeria after the first growing season.

Keep looking for more space, they will grow!

Most Produces on this page can be found at Florida Colors Nursery

A Guide for Growing Plumeria From Seed

2014 Seed Projects

2014 – April-May Seed Projects

As many of you know, I’ve been trying to get seedlings to bloom in less than 18 months for many years. I’ve been experimenting for years with many failures. But this year, I’ve had some success. Overall, I feel the attention to roots and my location in Zone 10B are the keys to my success. My latest seed project started on 3/11/2014,

Obviously, your conditions, products used and techniques differ from mine, but this is what I have done and what products I used.  I’ve provided as many product details as possible so you can substitute what is available in your area.

The main ingredients are Vitazyme, Root Activator, and Excalibur. This year, I have introduced Bioblast for foliar feeding. However, the most important factor is our subtropical location in Zone 11A.

Updated Sept 2, 2015, out of almost 300 seeds from 6 different varieties from two different countries, 19 seedlings have produced or attempted to produce an inflo out of 4 of the varieties.

  • Group 1: Temptation aka PC33 (pod parent) crossed with Super Round aka J115 (pollen parent)  – 1 seed pod produced 28 seeds, 24 were viable and planted on 4/11/14 – 8 seedlings have put on an inflo or nubbed. The first inflos was found on 6/22/15 and the last on 9/1/15. As of 9/18/2018, all but two have bloomed.

Photo Gallery of Blooms from Group 1 – Temptation and Super Round Cross:
All these are from the same seedpod.

no images were found

  • Group 2: Super Round aka J115 pod parent, self-pollinated – 120 Seeds planted on 5/6/14 – 9 seedlings have put on inflos. The first one was 15 months. 1 nubbed. One was blown off the table by the wind and broke off.
  • Group 3; Chompoo Zin (seeds came from Thailand) – 32 seeds planted on 5/6/14 – 1 seedling has inflo found 8/28/15
  • Group 4: Fire and Rain (seeds came from Thailand) – 42 seeds planted on 5/6/14 – 1 seedling has inflo found on 9/1/15. One so far is a keeper.
  • Group 5: Camelot – 38 seeds from one seed pod…sadly no inflos from my babies yet as of 9/1/15. 29 out of 38 have bloomed as of 9/18/2018

Photo Gallery of Blooms from Group 5 – Camelot x J115:
All these are from the same seedpod.

  • Group 6; Penang Peach – 24 seeds…none have put on inflos. as of 9/1/15

The attached photos are the two best so far. Others have bloomed but are rootstock grade. I’m patiently waiting for others to bloom. The attached photos are the two best so far. Others have bloomed but are rootstock grade. I’m patiently waiting for others to bloom.

The attached photos are the two best so far. Others have bloomed but are rootstock grade. I’m patiently waiting for others to bloom. The attached photos are the two best so far. Others have bloomed but are rootstock grade. I’m patiently waiting for others to bloom.

This is what I did. Every day, it seems I’m trying to improve each phase. So please remember this is still a work in progress!

Materials used:

Plumeria Seeds – It is very important to select viable quality seeds. It is possible to get a spectacular plumeria out of any plumeria variety. It is much more likely to get a spectacular plumeria out of a spectacular plumeria.

Soaking Seeds – Optional

Last year, I soaked my seeds in a kelp solution before planting and they sprouted in about two days. I would never use bleach in the soaking solution. If you are worried about contamination, try soaking in chamomile tea or 3% hydrogen peroxide instead. Hydrogen peroxideboth in soak and rinse solutions: 1 oz. of  3% H²O² to 1 pint of water.  Sprouts come up faster.  Some people have reported sprouts in 24 to 48 hours.

Some gardeners recommend adding something acidic, like a tablespoon or three of coffee or a few drops of kitchen vinegar. The idea is to recreate conditions in an animal’s stomach, where many seeds first get the warm, dark, damp idea to germinate. Anybody who’s seen a berry-laden pile of bear scat understands. We haven’t tried this method — no bear would cooperate — so we can’t vouch for the claim that it hurries the soaking process or increases the germination rate.  

  1. Soak/Dip seeds in Bioblast for about a minute or two. Longer is not better!
  2. Soak overnight or for about 8 hours in plain water – keep about 85 degrees if possible.

Planting Seeds

  1. Pre Soak or Drench soil in Soil Mix A

Note: Compressed Coir / Worm Casting

If using Compressed Pellets – Expand with Liquid Mix A
Soak, or drench filled Coir pots with Liquid Mix A

Note: Keep planted mix moist by misting daily and watering when necessary.

Mist with Water or Optionally Mist often with Bioblast – 1/3 tablespoon per gallon

  1. Plant seeds in 3” or 4” Coir Pots filled with Soil Mix A. (I’m trying CowPots this year: see below)

Note: Added Bioblast this year – 2015 (Mist with Bioblast weekly – You need 3 to 5 leaves)

LIQUID MIX A:

  • 1 oz Vitazyme per gal
  • 2 oz Root Activator per gal (Caution! This mix is for soaking or drenching; do not spray on leaves.)

Always use a sterile growing medium like mixes with vermiculite and perlite for your seed starting as these should not contain the fungi that cause damping-off. Water your seedlings with warm water left to sit for an hour or more to dissipate most of the chemicals in tap water. Using cold water stresses the seedlings, leaving them vulnerable to harmful organisms.

SOIL MIX A:

  • 1/3 Premier Pro-Mix BX -Mycorrhizae
  • 1/3 Quality Coir
  • 1/3 Quality Worm Castings
  • We may need to add perlite to ensure good drainage.

Transplanting to 1 gal pot

  1. When roots come out of the Coir Pots, transplant to 1 gal / 6 ½” black plastic pot
  2. Partially fill one gal pot so a 3” pot will set on top of the soil, but the top of the 3” pot does not extend higher than the soil level in the filled one gal pot.
  3. Optional: Allow the 3” pot to set on top of the soil until roots are established and the 3” pot starts to degrade.
  4. Fill the one gal with Soil Mix B until the top of the 3” pot is covered
  5. Add two tablespoons of Excalibur IX to the top of the pot and cover with 1” of Soil Mix B
  6. Soak or drench with Liquid Mix A

SOIL MIX B:

  • 1/3 Quality Coir
  • 1/3 Worm Castings
  • 1/3 Perlite
  • Foliar feed with Liquid Mix B
  1. Continue to Foliar Feed with Bioblast every two weeks – 1 tablespoon Bioblast per gallon.

Transplant to 3 gal pot.

  1. When roots come out of the 6 ½” pot, transplant to a 3 gal pot and fill with Soil Mix B
  2. Soak or Drench after transplant with Liquid Mix A
  3. Add two tablespoons of Excalibur VI to the top of the pot and cover with 1” of Soil Mix B
  4. Foliar feed with Liquid Mix C:
  5. Continue to Foliar feed with Bioblast every two weeks

LIQUID MIX C:

  • BR61 – 1 tablespoon per gallon
  • Vitazyme – 2 tablespoons per gallon
  • One tablespoon of Dawn Liquid Soap

Soil Mix A

  • 1/3 Premier Pro-Mix BX -Mycorrhizae
  • 1/3 Fine ground Coir
  • 1/3 Worm Castings
  • We may need to add perlite to ensure good drainage.

CowPots give seedlings a better beginning. (Testing in 2015)

Tender, young roots easily penetrate the sides and bottoms of CowPots, growing freely. This allows for air pruning and the formation of root buds. Secondary root development throughout the pot grows into dense, healthy root systems recognized as critical to growing healthy plants.

CowPots stay intact for up to 12 weeks – plenty of time to give seedlings a robust start.

The “pots you plant” – no crushing or tearing of pot wall needed. Place the planted CowPot in the ground. Plants suffer no transplant shock and establish themselves immediately.

Planted CowPots break down fast underground because of the nitrogen in composted cow manure. Within 3 to 4 weeks, decomposition is well underway. In studies comparing bio containers, CowPots vs. peat pots, CowPots degraded 88% compared to competing containers.

CowPots have been rigorously tested and validated by numerous universities and independent nursery partners. Testing has revealed that starting plants in CowPots can help shorten the growing cycle and increase fruit set by up to 10%!

3-1/2” Coir Pot with Wafers, Pack of 10

Just pop the soil wafers into the pots, add water, and stir—so easy!

Tired of lugging heavy bags of potting soil around? Save your back with Wonder Soil. Add water to the compressed soil and watch it expand up to 7 times its original volume. This soil-less medium is great for seed starting and contains a mix of coconut coir, peat moss, nutrients, and water-absorbing polymers. These special biodegradable polymers store and release water as needed for healthier plants and less watering and recommended for seeds.

Just pop the Wonder Soil wafers into the pots, add water, and stir. The neat little wafers expand to become exactly the right amount of soil for planting seeds. In addition to being less messy than potting soil, it promotes the quick growth of plants. And the all-natural pot makes re-potting the plant simple! Includes ten coir pots and wafers.

Coir

Coir maintains excellent air porosity even when saturated and gives better crops with faster developing roots and more flowers and fruit per plant when used correctly.

Coir has better water retention qualities than peat and other growing media. This has obvious advantages in dry climates or when plants cannot be watered frequently, such as in transit to market.

Coir peat absorbs moisture immediately, even from a dry state (unlike sphagnum peat, which tends to shrink when dry and form a water-repellent crust that causes water run-off from the top surface and water loss between the peat and the inside edge of the flower pot). Thus, plants growing in coir tend to recover better and more quickly from dry conditions.

The ease of re-wetting and the quick drainage characteristics of coir mean that coir needs to be irrigated less frequently and for shorter periods. This leads to reduced leaching losses of nutrients and lower water use.

The inherent qualities of coir and the optimum water/air availability are ideal for quick rooting and propagation. This often leads to more seedling rotations per year, a higher percentage of seedling and propagation take-up, and more efficient use of greenhouse equipment.

The lignin content of around 45% ensures that the excellent water/air ratio is maintained over a longer period than with many other substrates.

Because Coir originates above ground, it does not contain any soil diseases. In fact, several studies have indicated that coir substrate increases resistance to pythium and other root diseases.

Premier Pro-Mix BX -Mycorrhizae

Ingredients:

  • Canadian Sphagnum Peat Moss (75-85% by volume)
  • Perlite -horticultural grade
  • Vermiculite-horticultural grade
  • Dolomitic and Calcitic limestone (pH adjuster)
  • Wetting Agent
  • Mycorrhizae- endo mycorrhizal inoculum (Glomus intraradices)

PRO-MIX BX MYCORRHIZAE is a general-purpose peat-based professional growing media designed for a wide range of greenhouse and transplanting applications that contain mycorrhizal inoculum (Glomus intraradices). These microscopic fungi attach to and colonize the root systems working in symbiosis with plants. It benefits the plant by increasing water and nutrient acquisition (especially phosphorus, copper, and zinc). This symbiotic relationship between fungi and plants results in overall improved plant growth. PRO-MIX BX MYCORRHIZAE is suitable for a wide variety of horticultural plants

Benefits**

  • This product answers the needs of most growing applications
  • Lightweight, low bulk density
  • High water retention capacity
  • Vermiculite improves nutrient retention
  • MYCORRHIZAE improves the overall growth of plants and increases yields of flowers/fruits

Carl Pool’s Root Activator

Description: Natural glycosides derived from pecan shells and water. Glycosides comprise a wide array of substances that comprise a significant proportion of cellular and tissue contents of plants and have a critical influence on plants in root, stem, and leaf development. Beneficial flavonoids often occur as glycosides; some are important coloring agents for flowers attracting insects and birds, while others promote disease resistance. This product prevents transplanting shock and stimulates fast root growth and forking of the root system.

Ingredients:

  • Glycosides 7.5%
  • Gibberellin 0.03%
  • 3-Indolaecetic Acid 0.02%
  • Kinetin 0.02%
  • Inert: 92.43%

Vital Earth’s Vitazyme

WHAT IS VITAZYME?

Vitazyme is an all-natural liquid biostimulant with particular biological activators created through a proprietary fermentation process. These active agents include vitamins, enzymes, triacontanol, and other powerful but gentle growth stimulators. In the future, agriculture must emphasize the use of biological systems and not rely solely upon chemical approaches to achieve long-term soil productivity. Vitazyme promotes soil life by working with the natural ecosystem to invigorate rhizoshperic activity.

  • INCREASE CROP YIELDS AND PROFITS
  • IMPROVE CROP QUALITY
  • REDUCE FERTILIZER NITROGEN INPUTS
  • HASTEN GERMINATION AND MATURITY
  • IMPROVE SOIL STRUCTURE AND INFILTRATION

Excalibur Fertilizer

Excalibur is a water sensitive slow-release granular fertilizer. Granular fertilizers are easier to control because you can see how much fertilizer you use and where it’s being dispersed. The advantage of slow-release fertilizers is that the nutrients are available gradually over time. This means that the gardener can fertilize less often, providing nutrients slowly and steadily. This is how plumeria prefers to be fed and helps them grow well.

Excalibur is an 11-11-13 mix of nitrogen (N), phosphorus (P), and potassium (K)

Micronutrients – The Hidden Story…And, Often Only Delivered by Slow Release Fertilizers! Excalibur contains the Micronutrients essential to plant growth and health that are only needed in very small quantities.

  • Copper(Cu = 0.110%) is a component of some enzymes and vitamin A. Symptoms of copper deficiency, include browning of leaf tips and chlorosis.
  • Iron(Fe = 0.484%) is essential for chlorophyll synthesis, so an iron deficiency produces chlorosis.
  • Manganese(Mn = 0.358%) activates some important enzymes involved in chlorophyll formation. Manganese deficient plants will develop chlorosis between the veins of their leaves. The availability of manganese is partially dependent on soil pH.
  • Molybdenum(Mo = 0.005%) is essential to plant health. Plants use molybdenum to reduce nitrates into usable forms. Some plants use it for nitrogen fixation. Thus, some soils may need to be added before seeding legumes.
  • Zinc(Zn = .110%) participates in chlorophyll formation and activates many enzymes. Symptoms of zinc deficiency include chlorosis and stunted growth.

Bioblast Fertilizer

Bioblast works with every part of your plant. Soil organisms are invigorated with Vitzyme biostimulants, which provide quicker, more vigorous growth. Rooting is encouraged with our Root Activator. A balanced NPK provides the essentials of plant growth and structure. B vitamins and Zinc encourage a robust immune system, while Iron promotes chlorophyll production in the leaves.